1. Purpose
- The shop can create chatbot (for the first time) to automatically reply to customers’ messages/commentsor or send information on promotion, products, shop information according to preset script when there is no staff or the staff has not replied within 10 minutes.
2. Instruction steps
– On Chatbot settings, you can Use built-in chatbot or Create your chatbot.
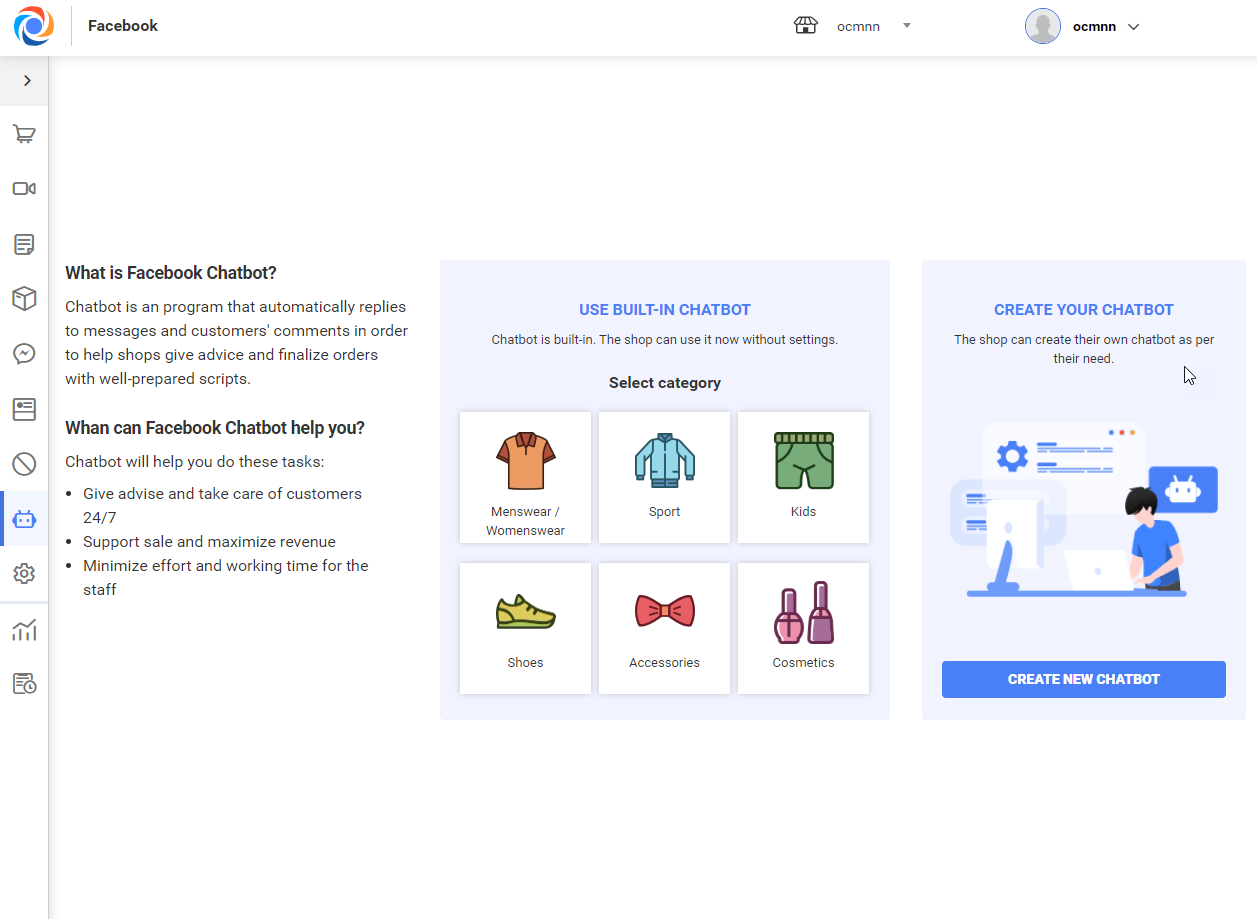
– Click Create your chatbot to add a new chatbot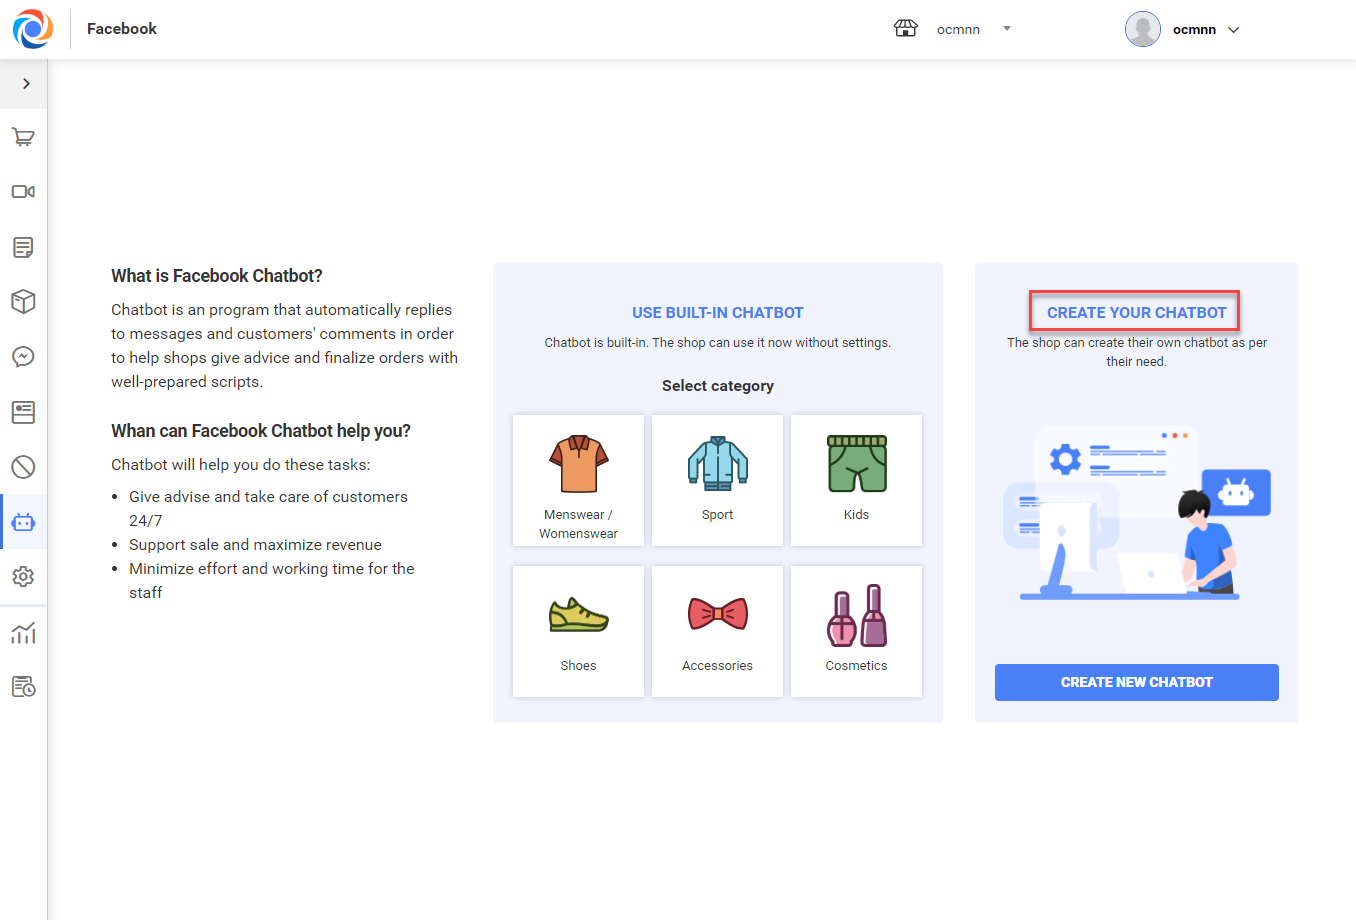
– After selecting Create your chatbot, the program shows 6 steps of creating a chatbot including: Chatbot name, Greeting, Greeting script, Default reply, Reply by keyword and select fanpage to use chatbot.
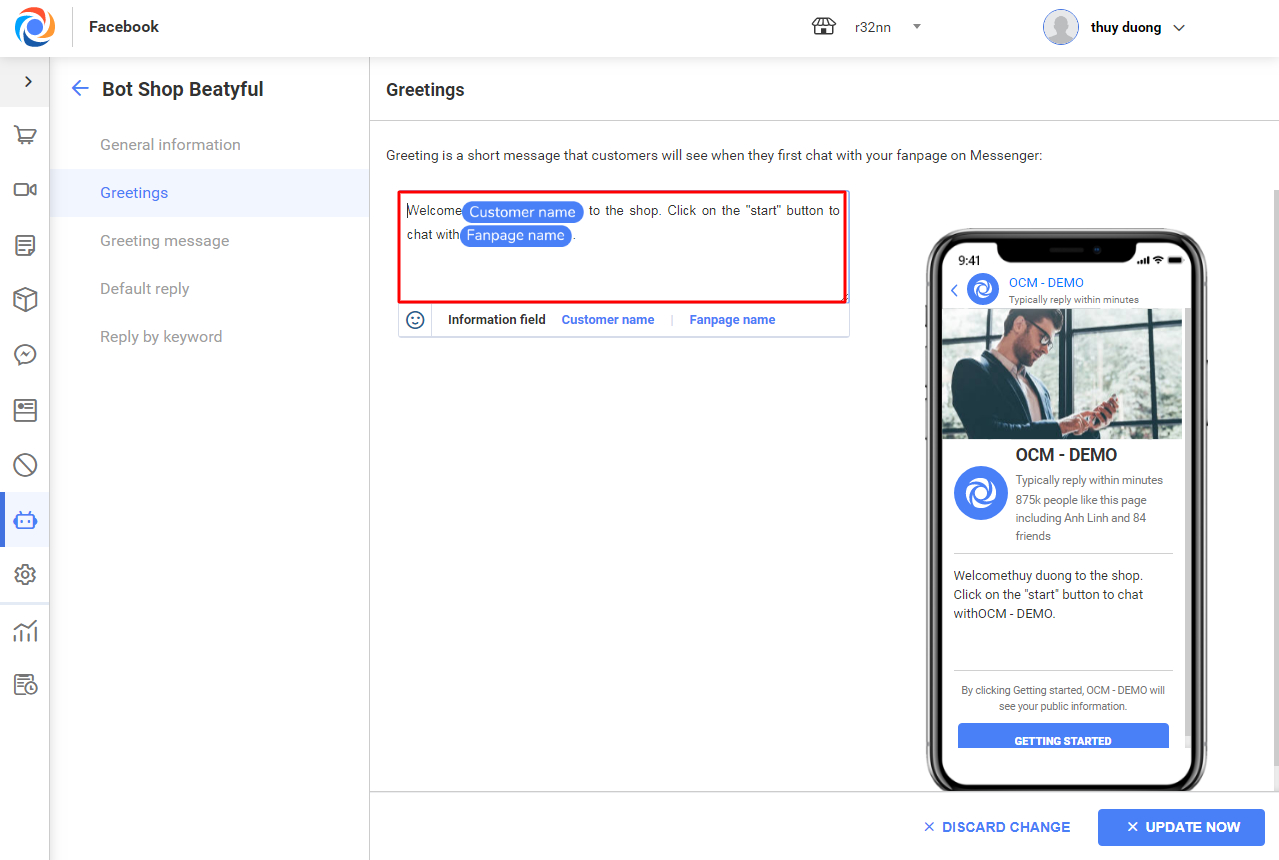
+ Greeting: It will be shown when the customer chats with fanpage for the first time.
+ Greeting script: It will be shown when the customer clicks Start.
+ Default reply: the customer receives it when they leaves message/comment on the fanpage but there is no staff or the staff has not replied within 10 minutes.
+ Reply by keyword: the customer receives it when their message/comment contains keyword as set in the chatbot.
2.1 Chatbot name
– Chatbot name is the product type the shop is selling. The manage can give chatbot a name by entering directly on the box.

2.2 Greeting:
– On Greeting, the manager enter content of Greeting with mixing fields Customer name and Page name. After that, move the mouse out of the box and the manager will see how the greeting appears on the smartphone.
(Note: When the customer sends message for the first time, in the Greeting Customer name will be replaced by the customer name and Fanpage name will be replaced by the fanpage using chatbot)
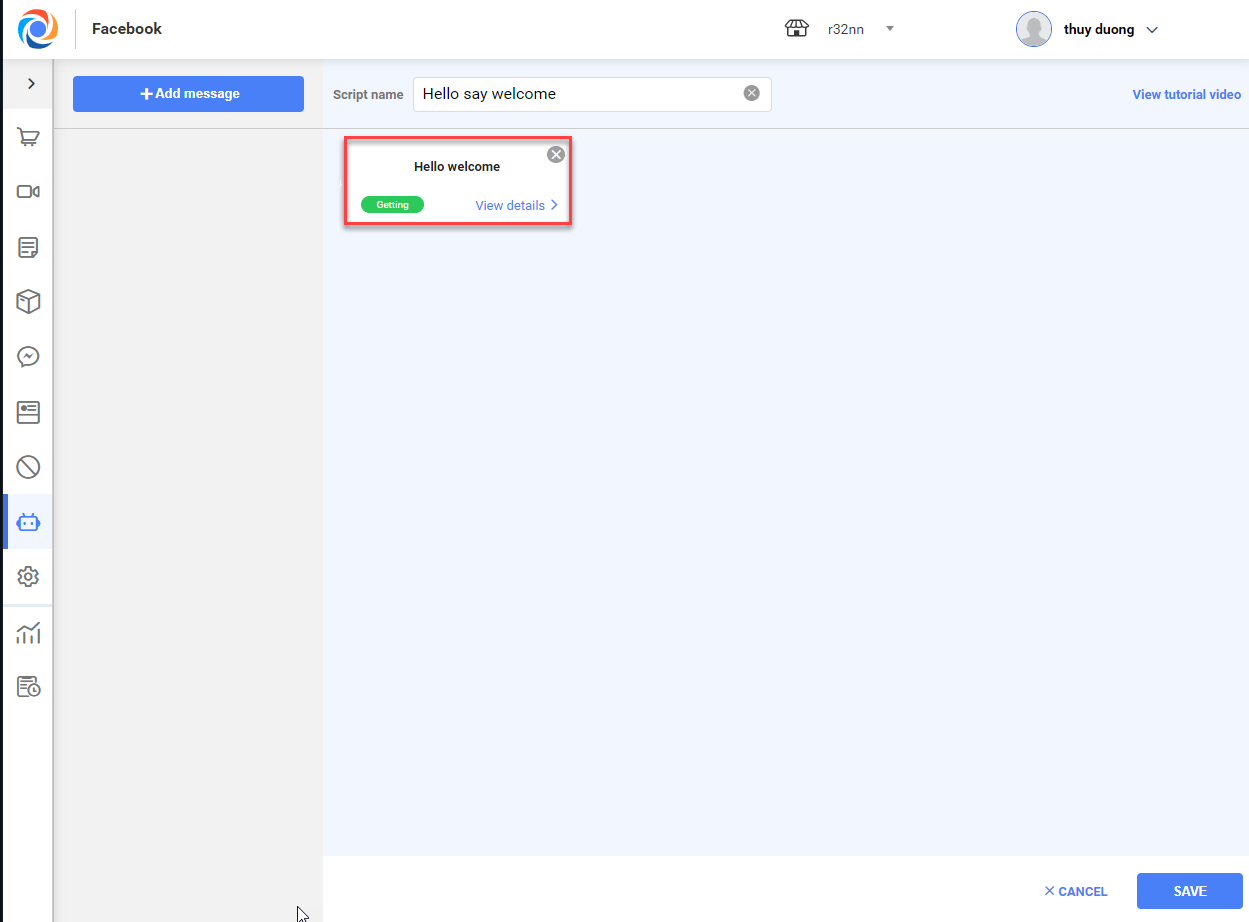
2.3 Greeting script
– This appears after the customer clicks Start.
– The program allows to prepare a greeting script based on predicted questions.
– Below is an example on how Greeting script works (with the buttons Promotion Program, View products, Call now. When the customer clicks any button, corresponding message will appear)
On Greeting script, the program shows 2 options: Message and Script.
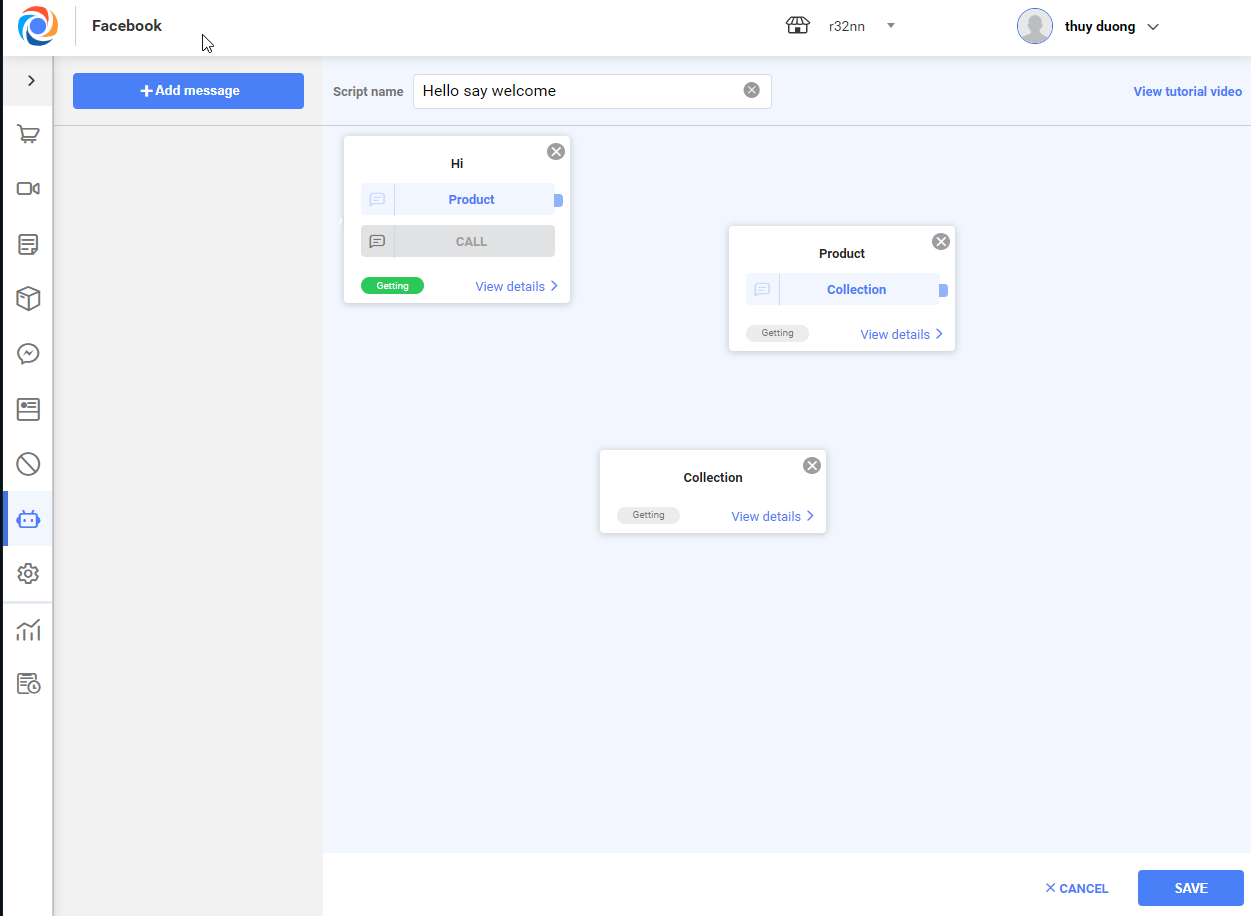
– Case 1: Select Script to create Greeting script. Get started with adding new message.
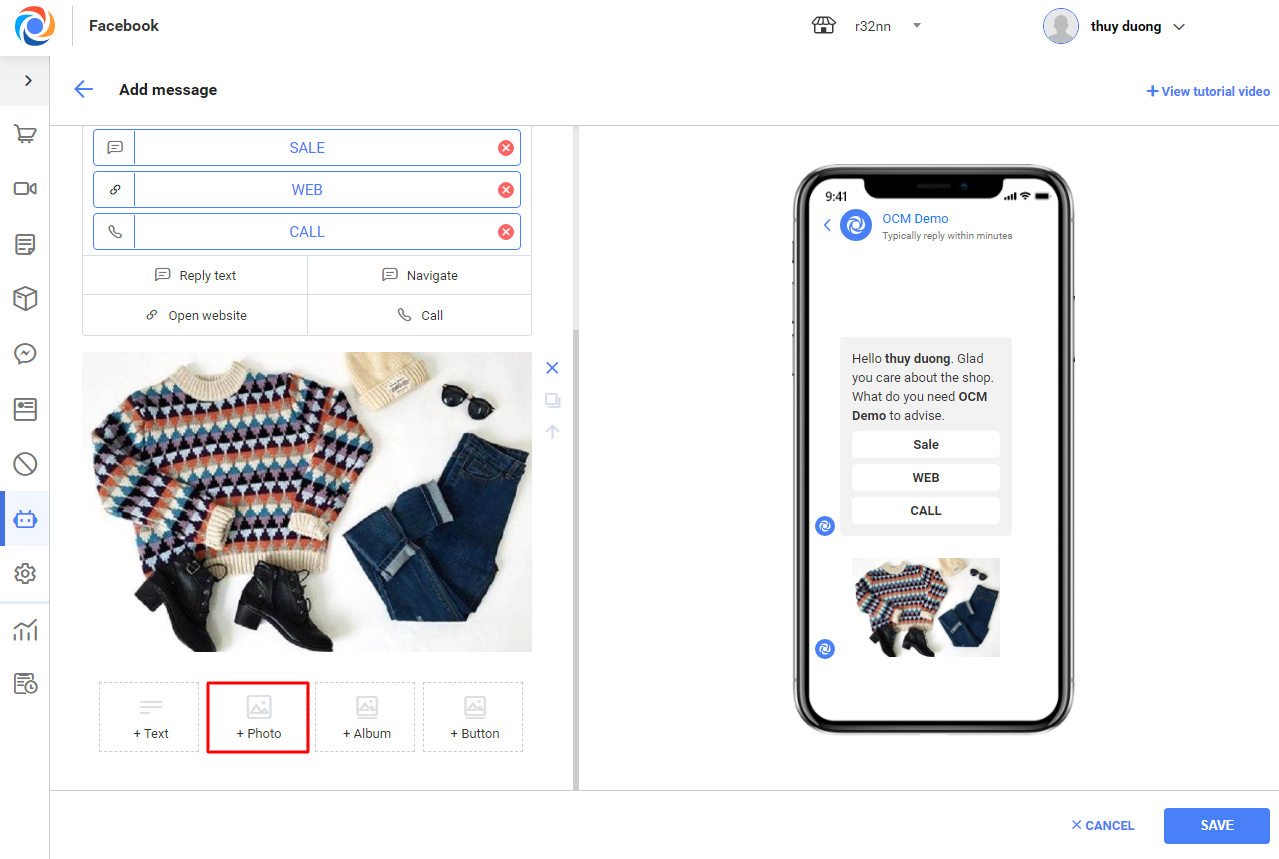
+ Click Add message and enter information.
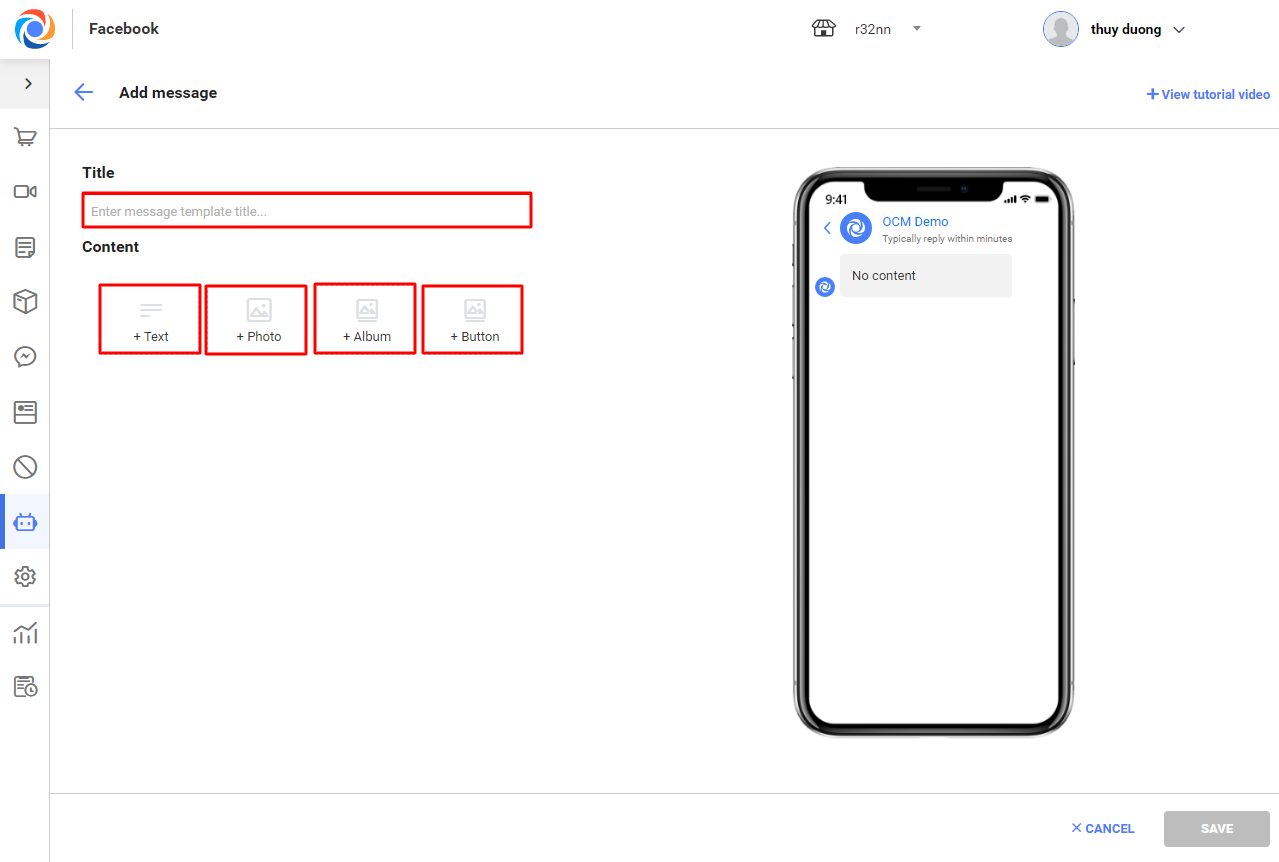
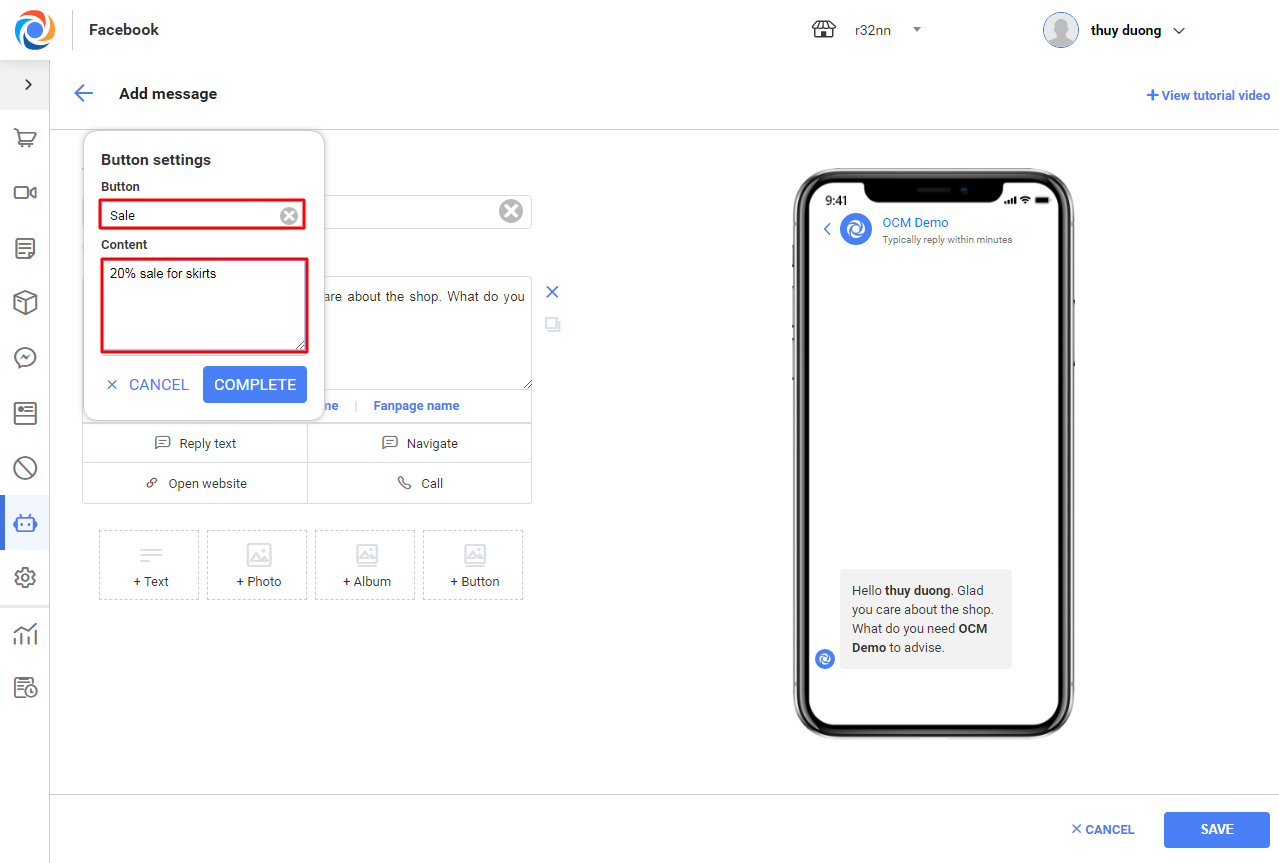
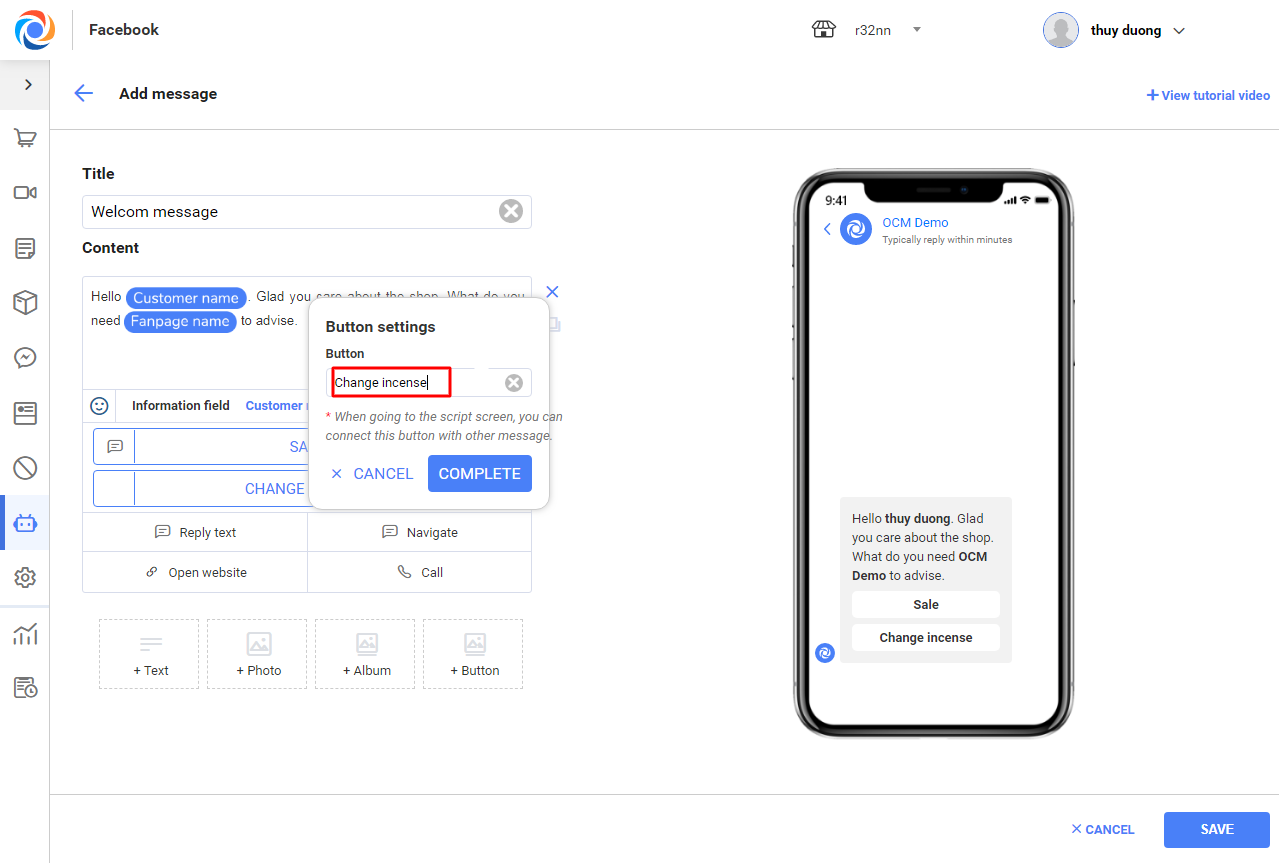
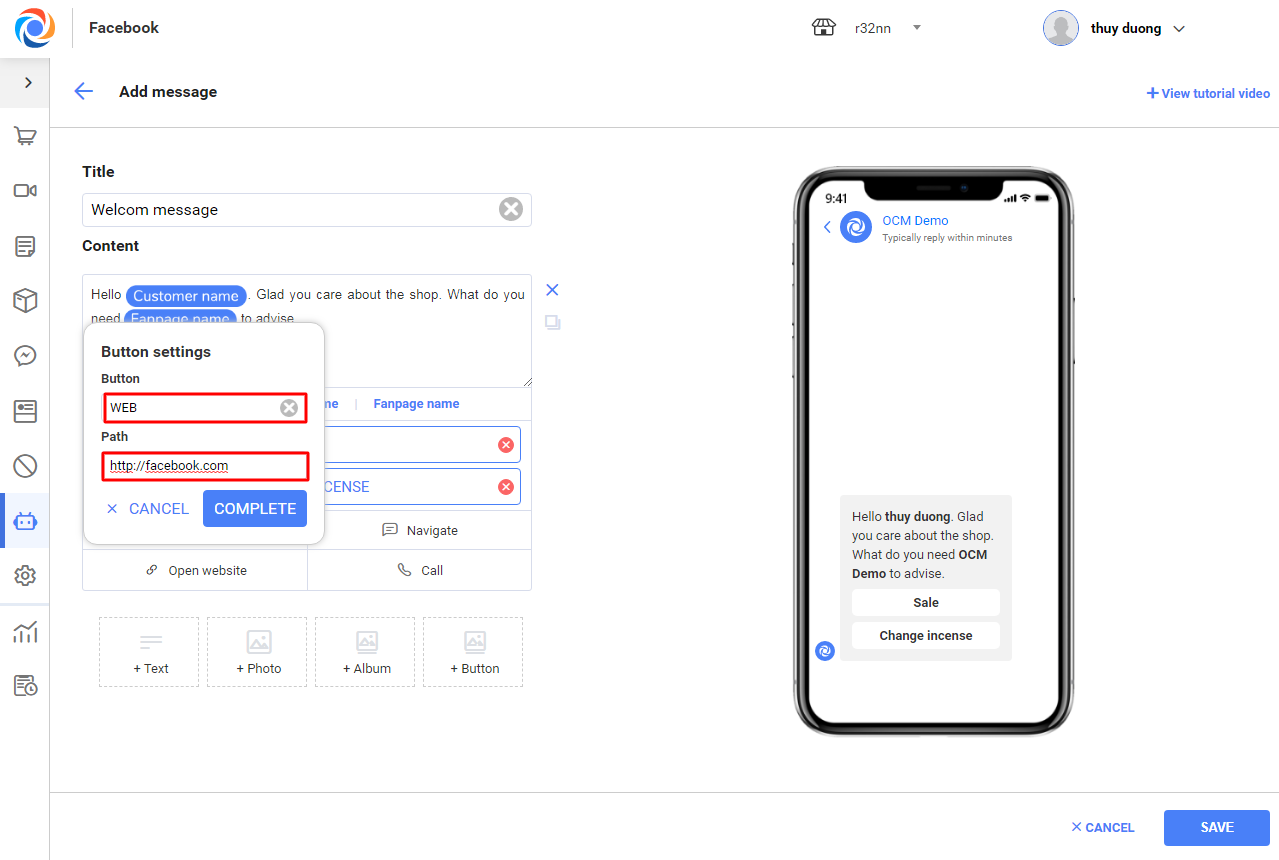
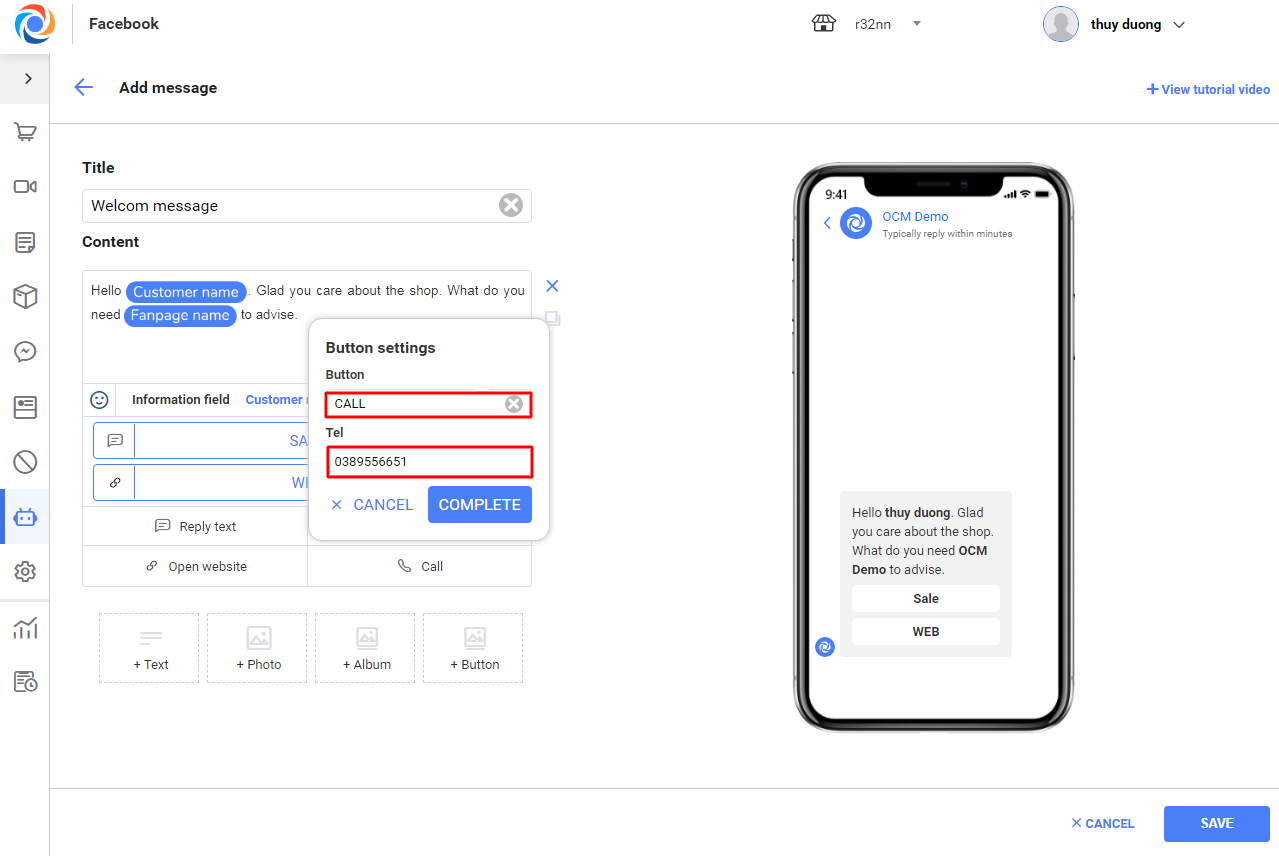
+ Text button includes 4 sub-buttons: Reply text, Navigate, Open website, Call
- Reply Text button: Enter button name and Content the customer will receive upon clicking this button
- Navigate button: When the customer clicks this button, it will navigate to another message in the script.
- Open website button: When the customer clicks this button, the preset website will be opened.
- Call button: When the customer clicks this button, they will call the shop.
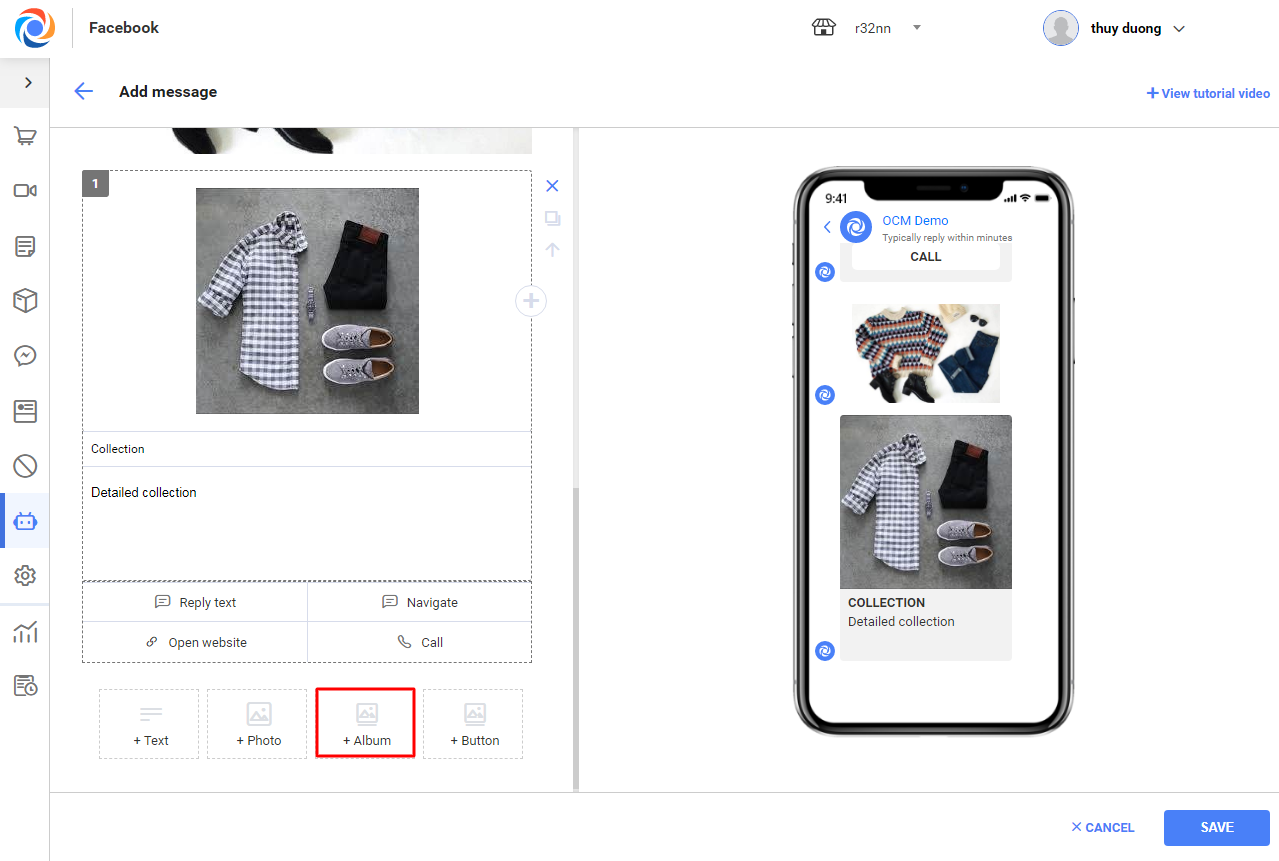
+ Click Select photo to add photo to the message.
+ Click Collection to add collection to the message.
+ Click Button to add more buttons
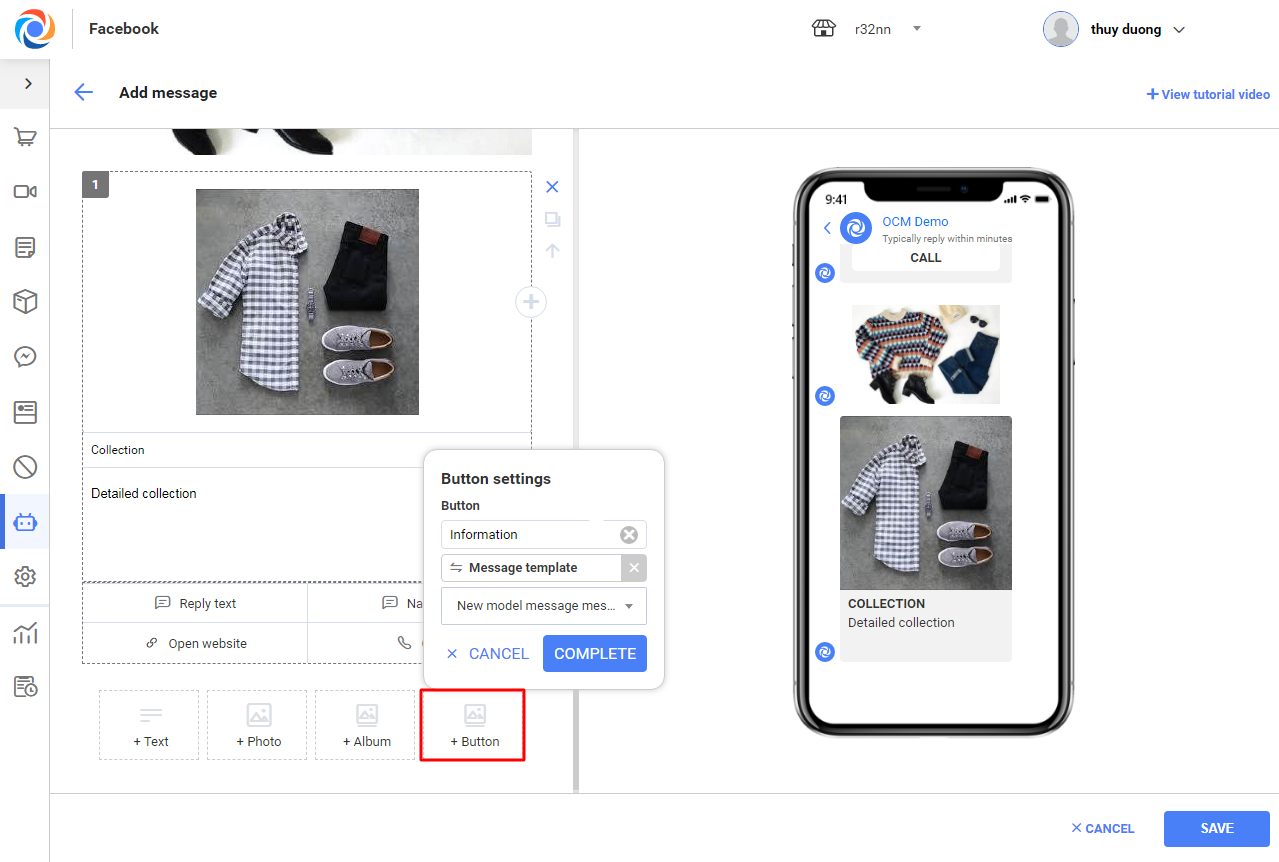
+ During message settings, the manager can preview message. Click Save to save the message or Cancel to cancel adding new message.
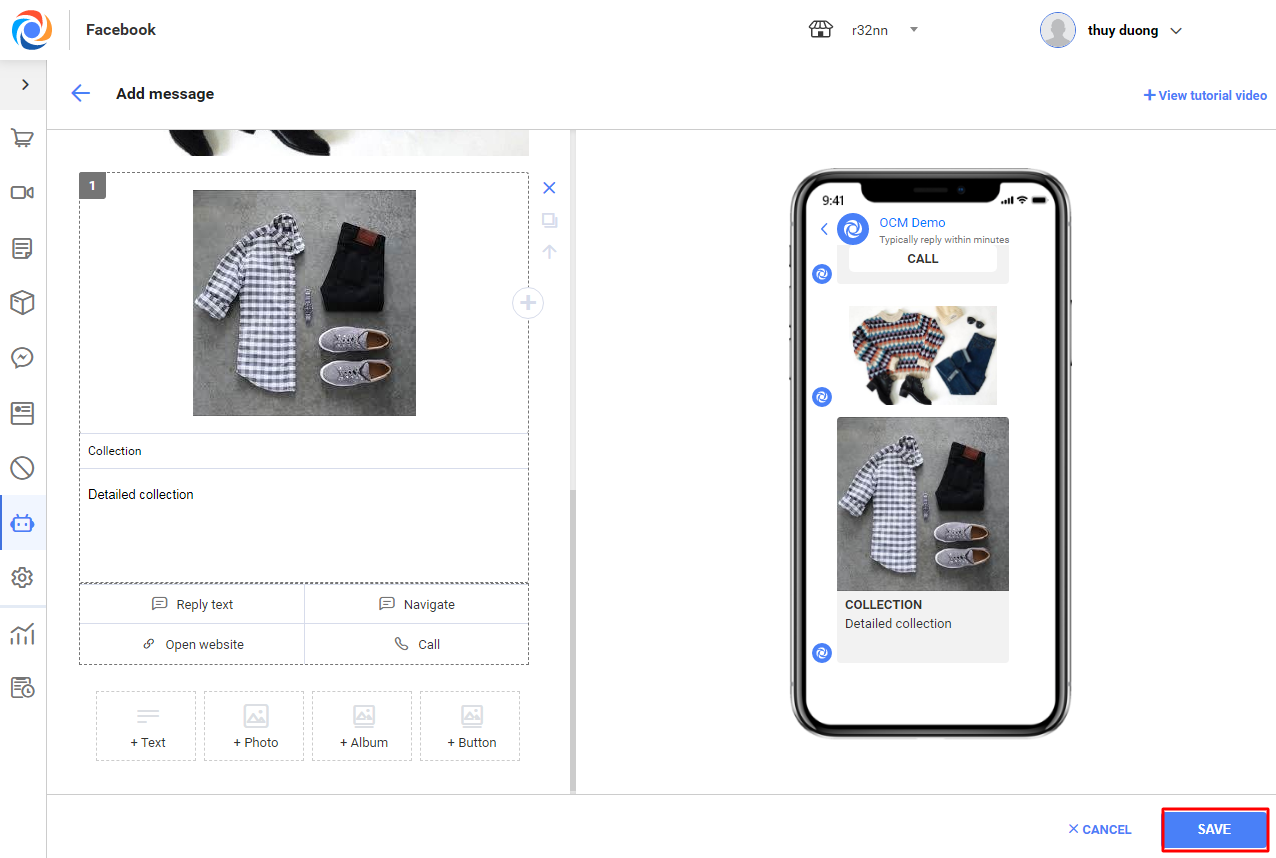
– After adding a message, you will see this new message on Message Script/Script screen.
– Continue creating more messages according to the script.
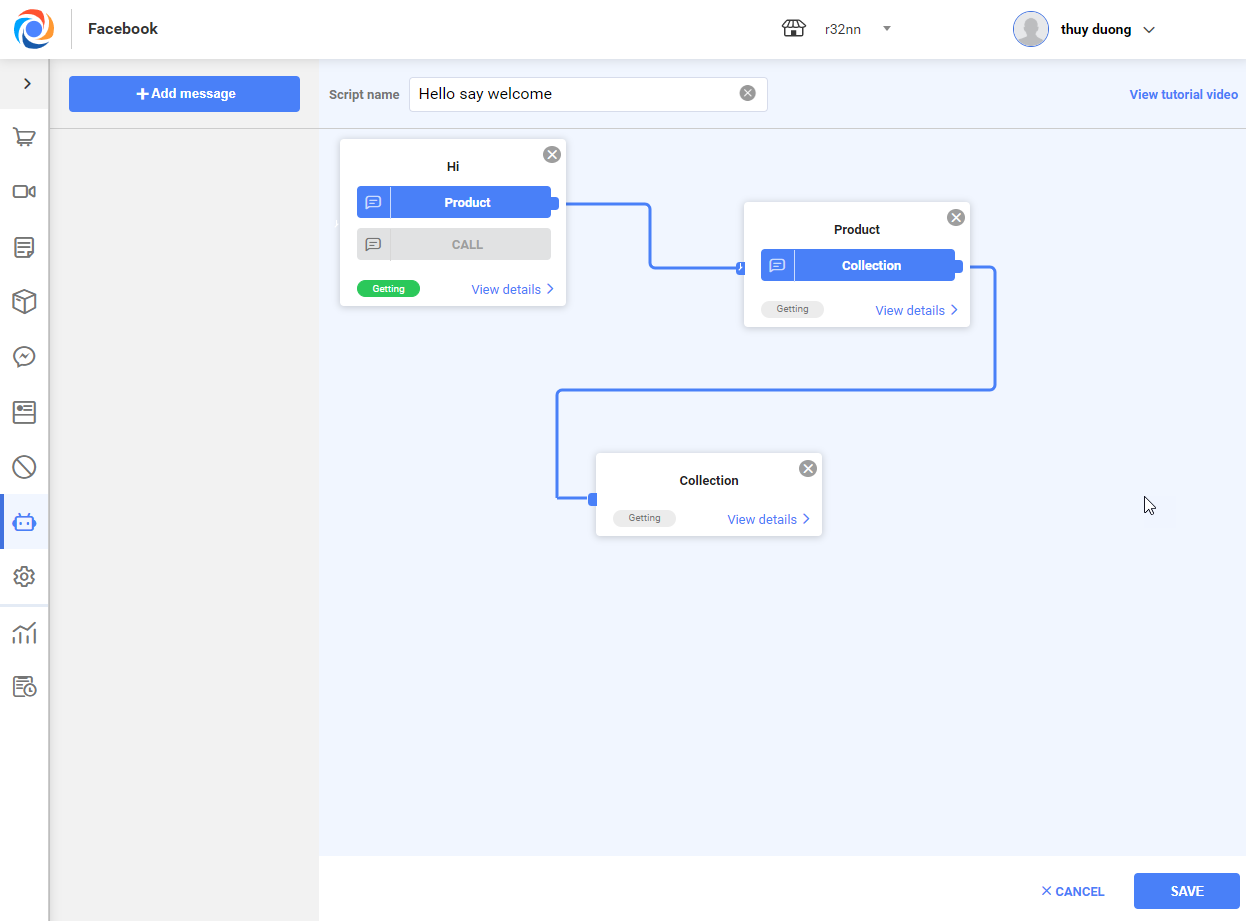
– Hold and drag the new message to Greeting script area.
– Click on Start button to select the first message in the script the customer will receive.
– Hold and drag buttons in dark blue to connect messages with each other to make a complete script.
Case 2: In case of checking Message in Greeting script the manager follows the same steps as above
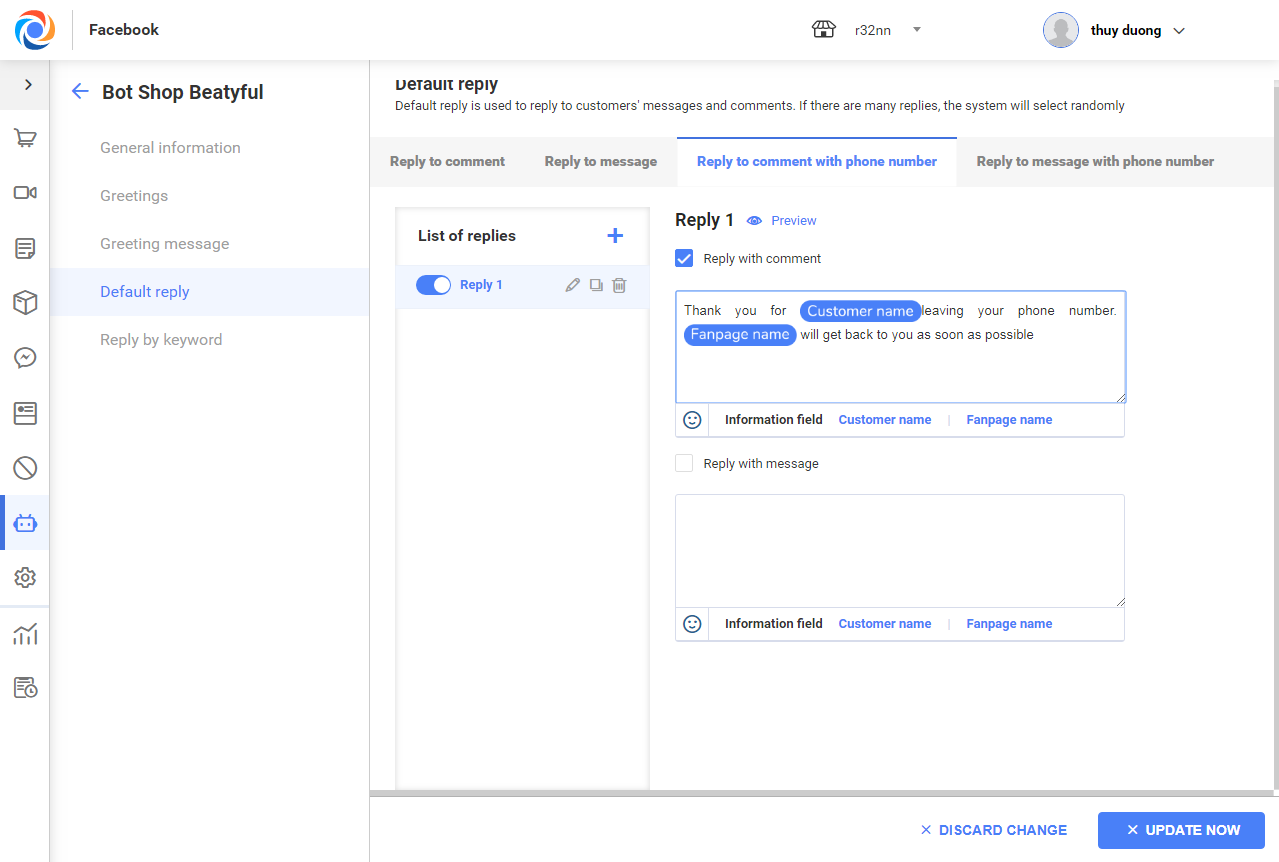
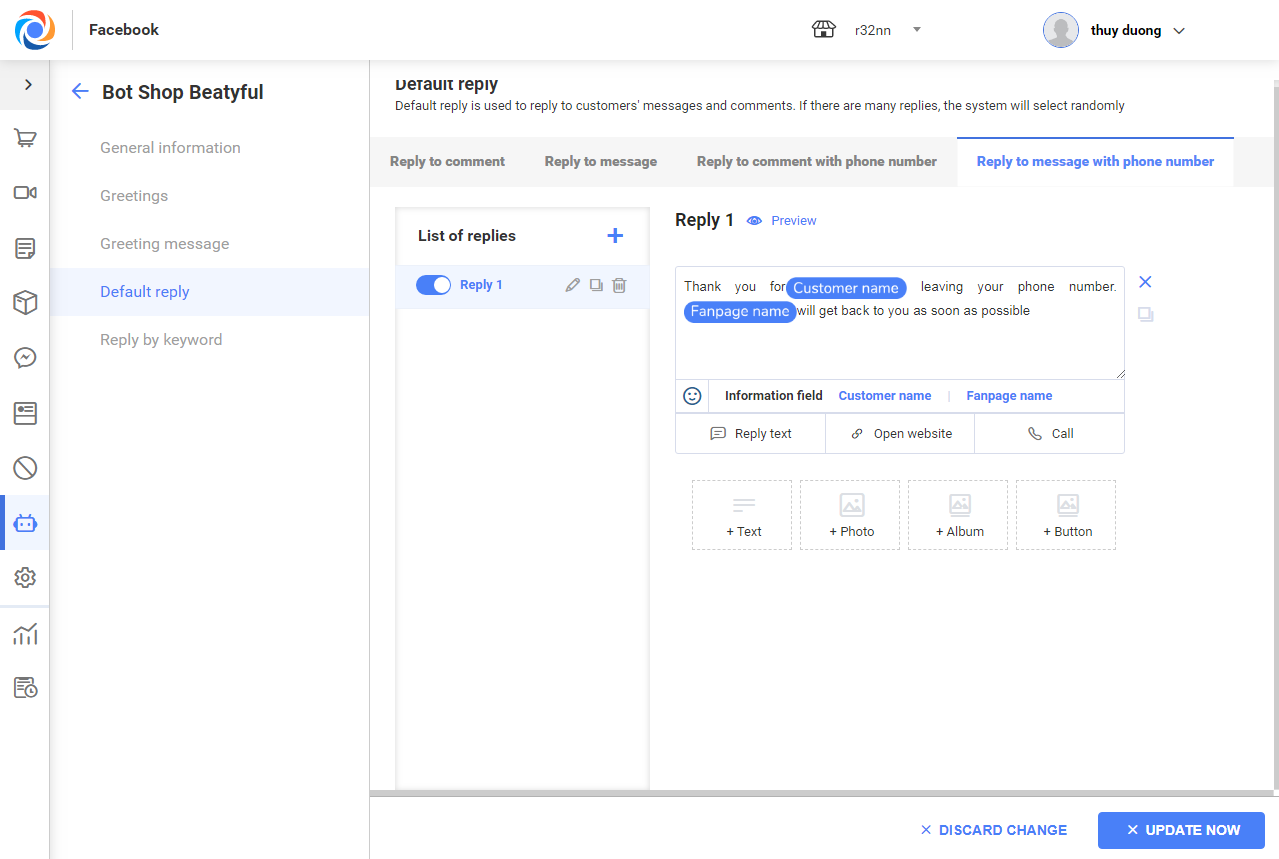
2.4 Default reply
– Here you will see 4 tabs: Reply to comment (to reply to customers’ comments), Reply to message (to reply to customers’ messages), Reply to comment with phone number (to reply to customers’ comments including phone numbers), Reply to message with phone number (to reply to customers’ messages including phone numbers).
+ Add Reply to message: The program shows 2 options: Reply with comment and Reply with message. Check either of them if you want to automatically reply to customers with comments or messages. Check both of them if you want to automatically reply to customers with both comments and messages.
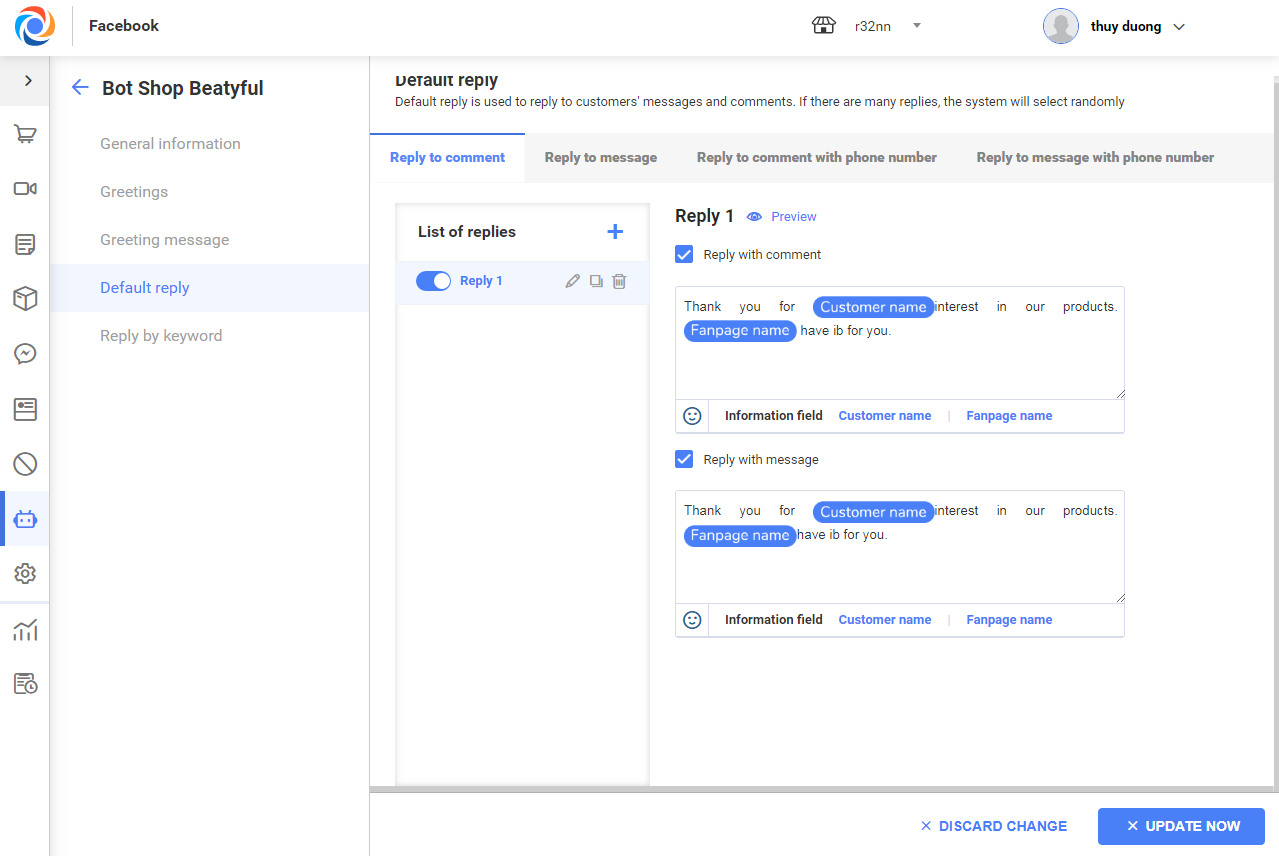
– Click  to edit Default reply if you want to make any change.
+ Add Reply to message: Enter content of message when the customer sends message to the fanpage. Follow the same steps as adding new message in Message Script above.

+ Add Reply to comment with phone number: The program shows 2 options: Reply with comment and Reply with message. Check either of them if you want to automatically reply to customers with comments or messages. Check both of them if you want to automatically reply to customers with both comments and messages.
+ Add Reply to message with phone number: Enter content of message to reply to customers’ comments with phone number. Follow the same steps as adding new message in Message Script above.
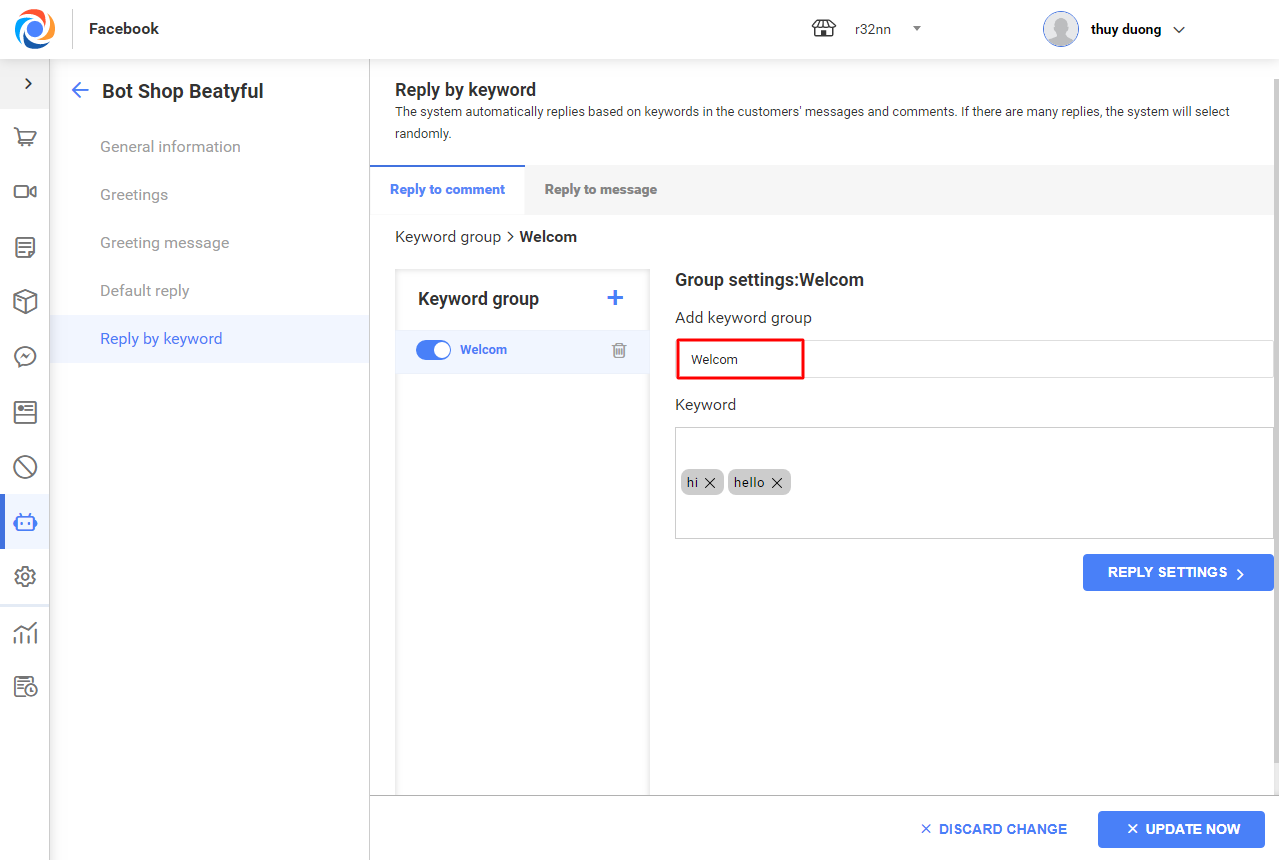
2.5 Auto-reply by keyword
– The program will automatically reply based on keywords in the customers’ messages/comments. These keywords are set by the Manager according to the advice script.
– The same as Default reply, when the customer leaves comment, you can select Reply with comment, Reply with message or Reply with both comment and message.
– To set up reply to comment or message, click the icon  to add keyword group.
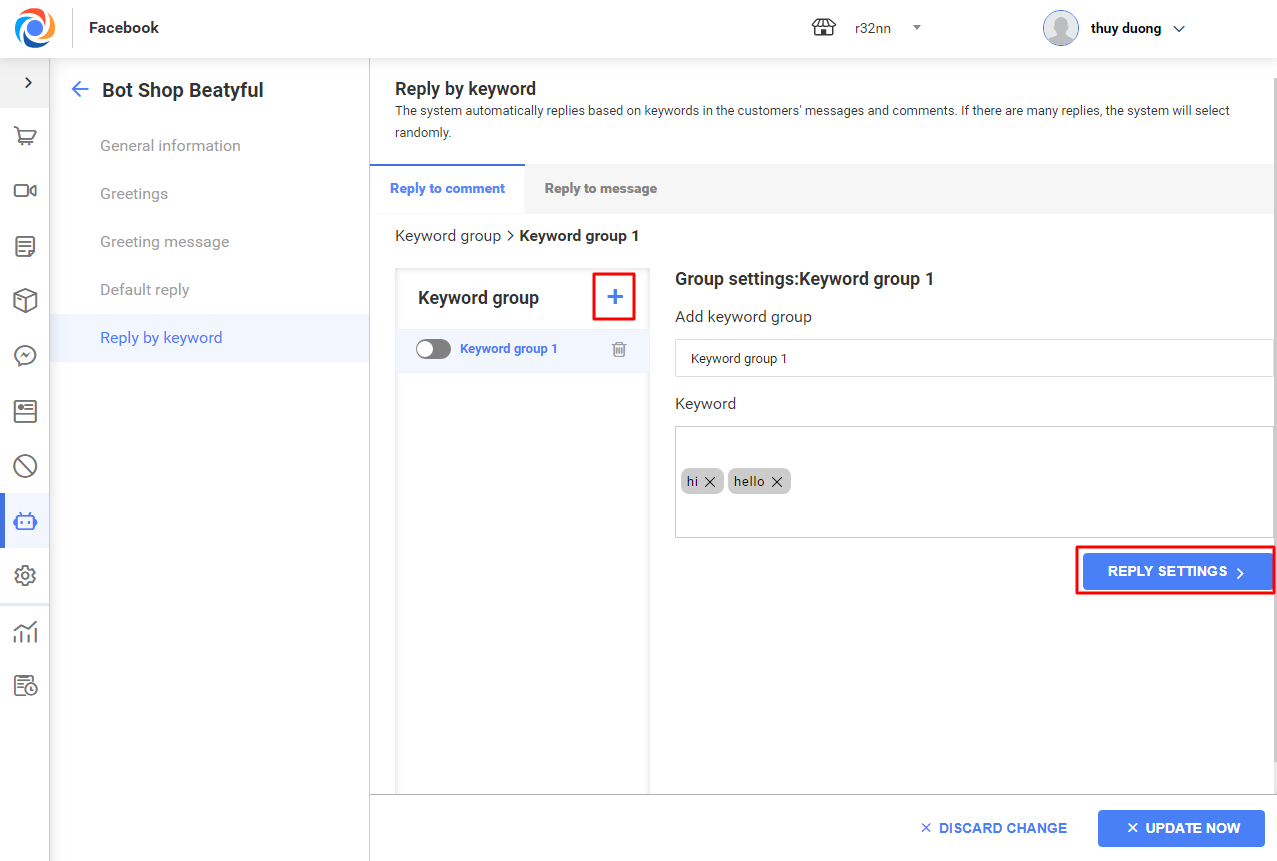
– Name the keyword group and enter keywords.
– Click Reply settings to edit or add auto-reply to each keyword group.
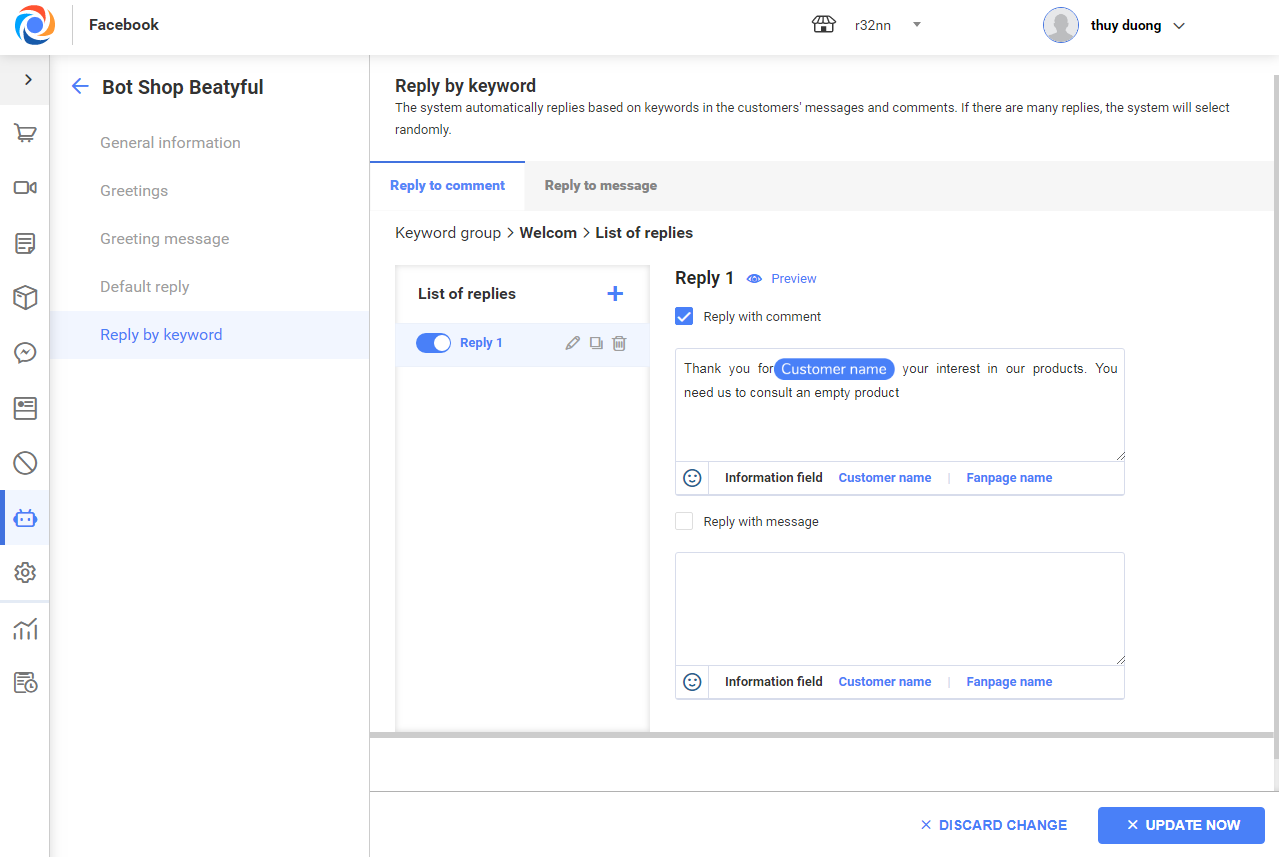
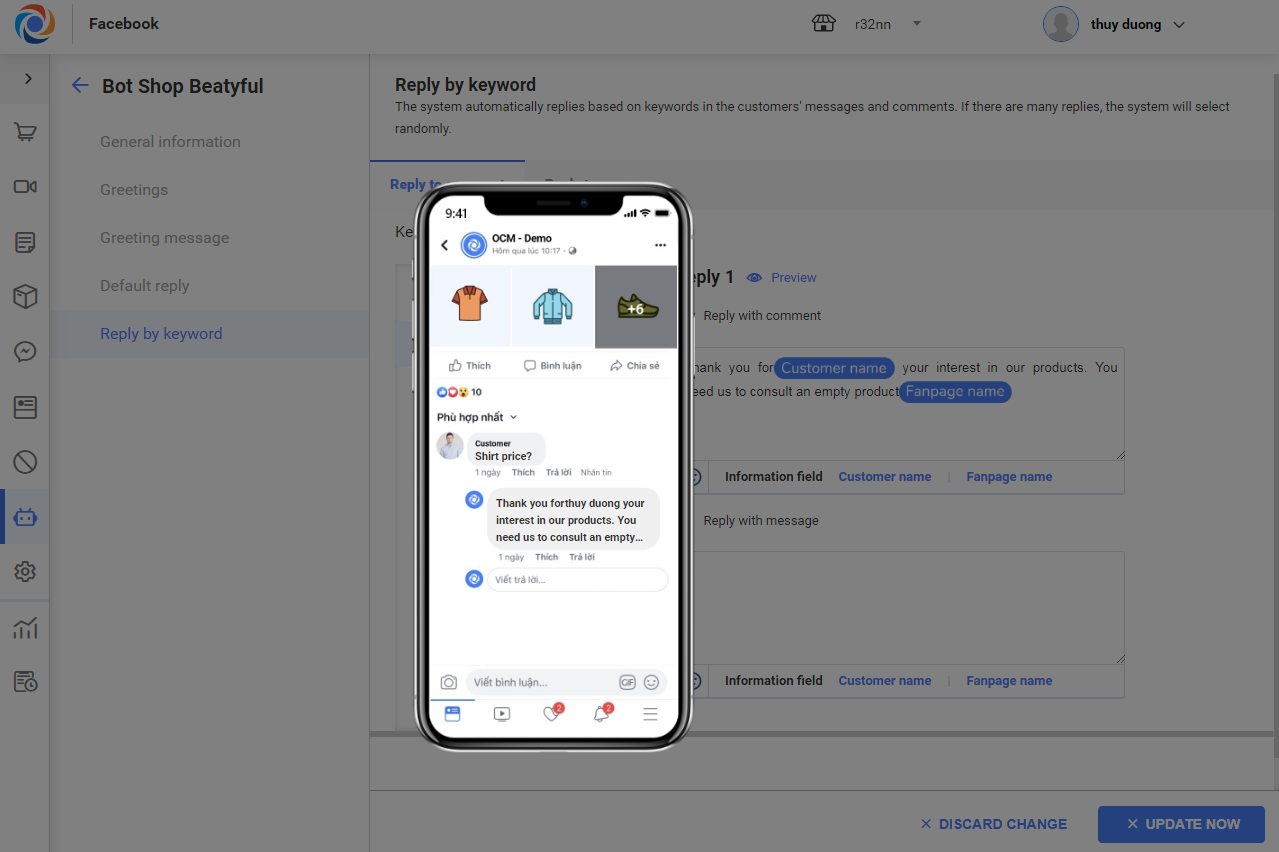
– Click the icon Preview to preview the reply.
Note: If 1 keyword has different auto-replies, when the customer leaves comment/message they’ll randomly receive 1 of those replies.
2.6 Complete
– Here the program show all fanpages connected to OCM. Click on the fanpage to apply chatbot and Chatbot name or select General Chatbot to apply to all fanpages.
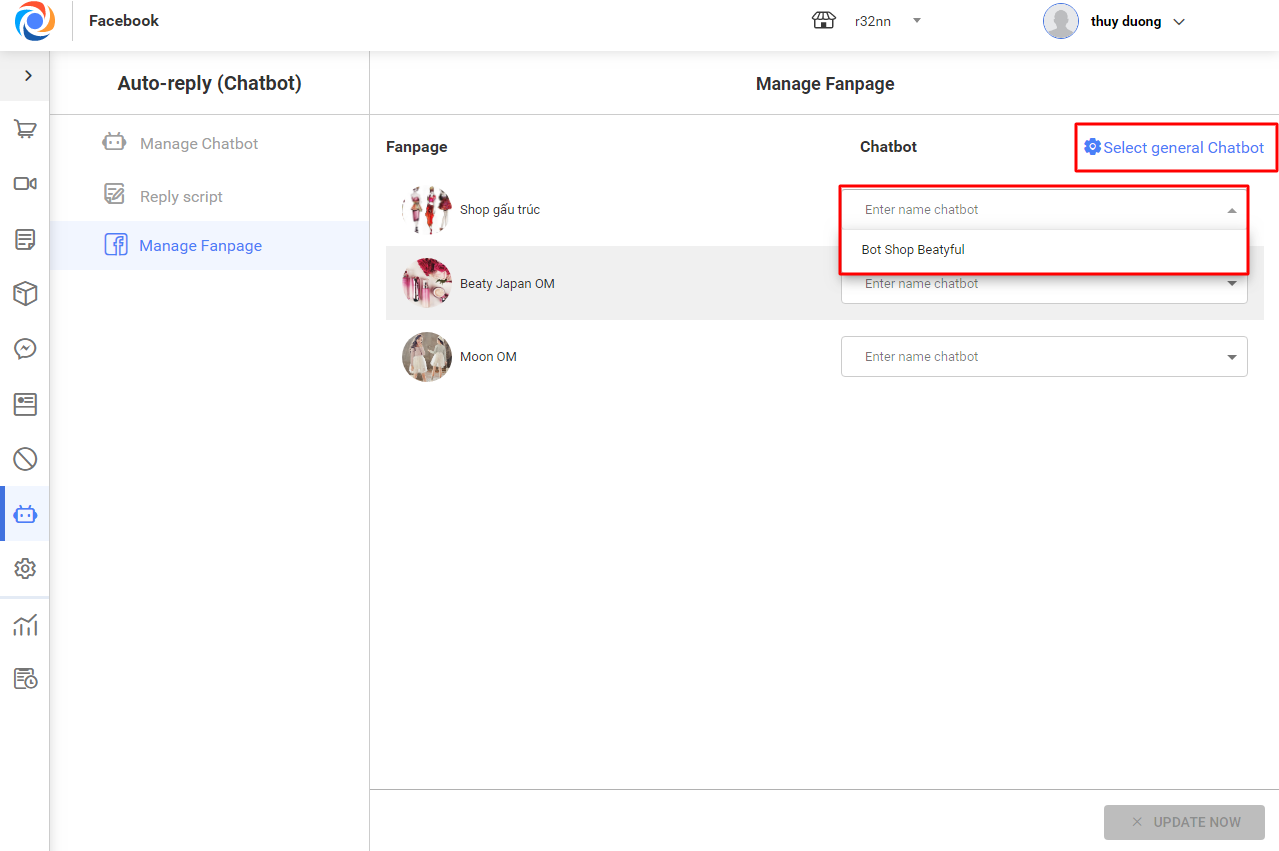
– Click Activate chatbot to apply chatbot to the selected fanpage(s).


