I. WEB
1. The program allows to manage items by location in the storehouse (Pilot in some shops)
2. The manager can merge multiple checking notes into one to handle.
3. The program allows to select to apply pricelist to all items or by item category.
4. On Shipping book, the manager wants to include address, item information to export and send to the shipper.
II. PC
1. The program adds A6-sized shipping note which shows price before and after promotion.
2. When advising the customer, the cashier can know price after promotion
3. The program allows to temporarily transfer items
I. WEB
1. The program allows to manage items by location in the storehouse (Pilot in some shops)
Details of change: Currently, the shop chain manages sale storehouse and storehouse for storage separately. The storehouse for storage is divided into multiple locations. Each location has an ID. Therefore, the manager want to manage items in details by location right on the program. As of R31, the program allows to manage items by location in the storehouse so that the salesperson and storekeeper can easily and quickly take it for the customers.
This feature is in pilot. Please contact MShopKeeper Support Team to try it.
- On the management page
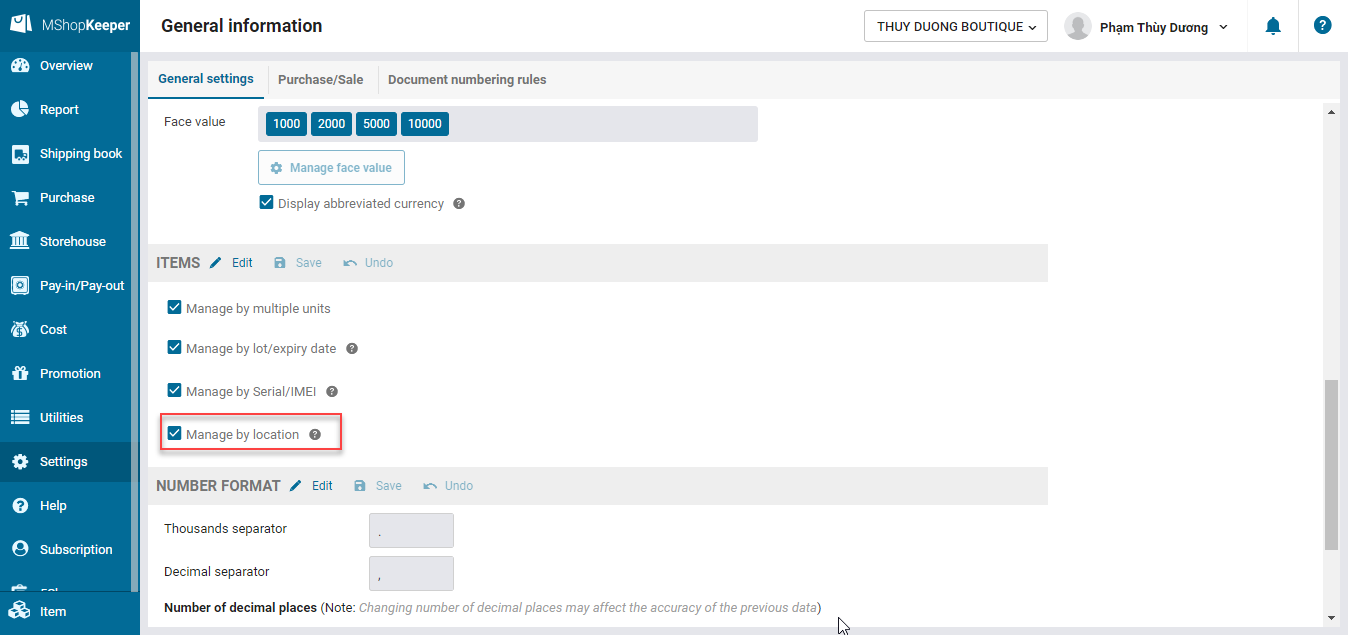
Step 1: Go to Settings, General information, on Item click Edit and check Manage by location. Then click Save.
Step 2: Go to Storehouse/Item location
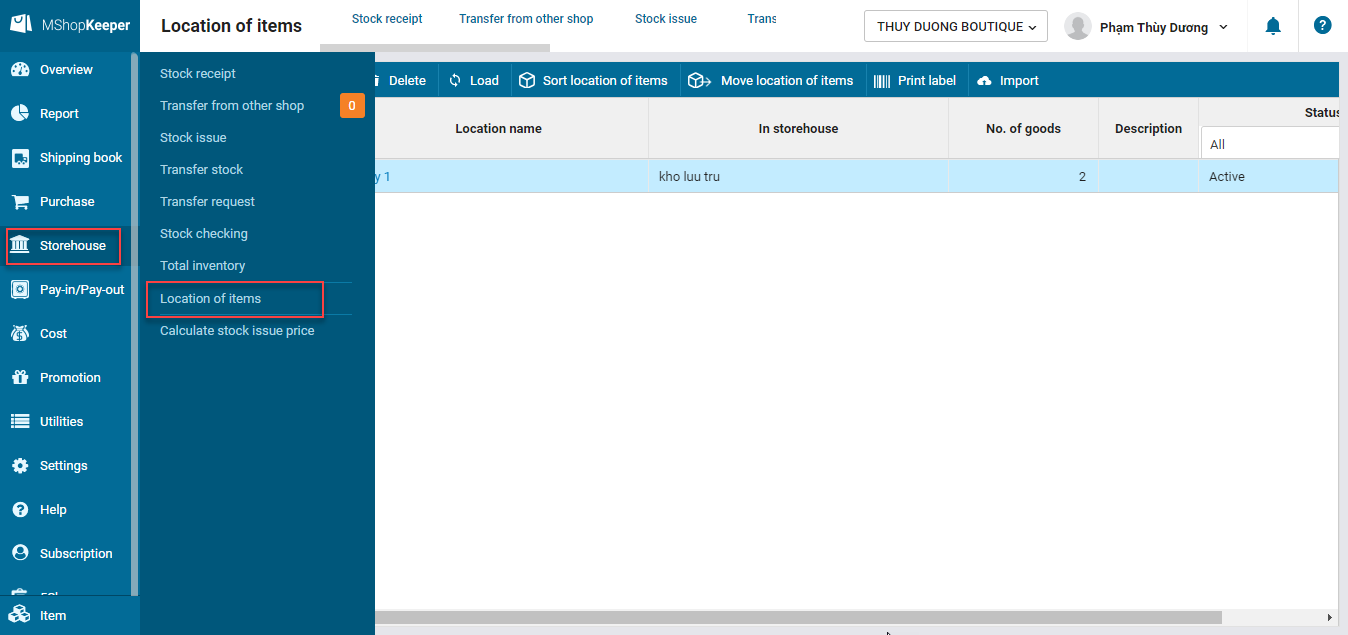
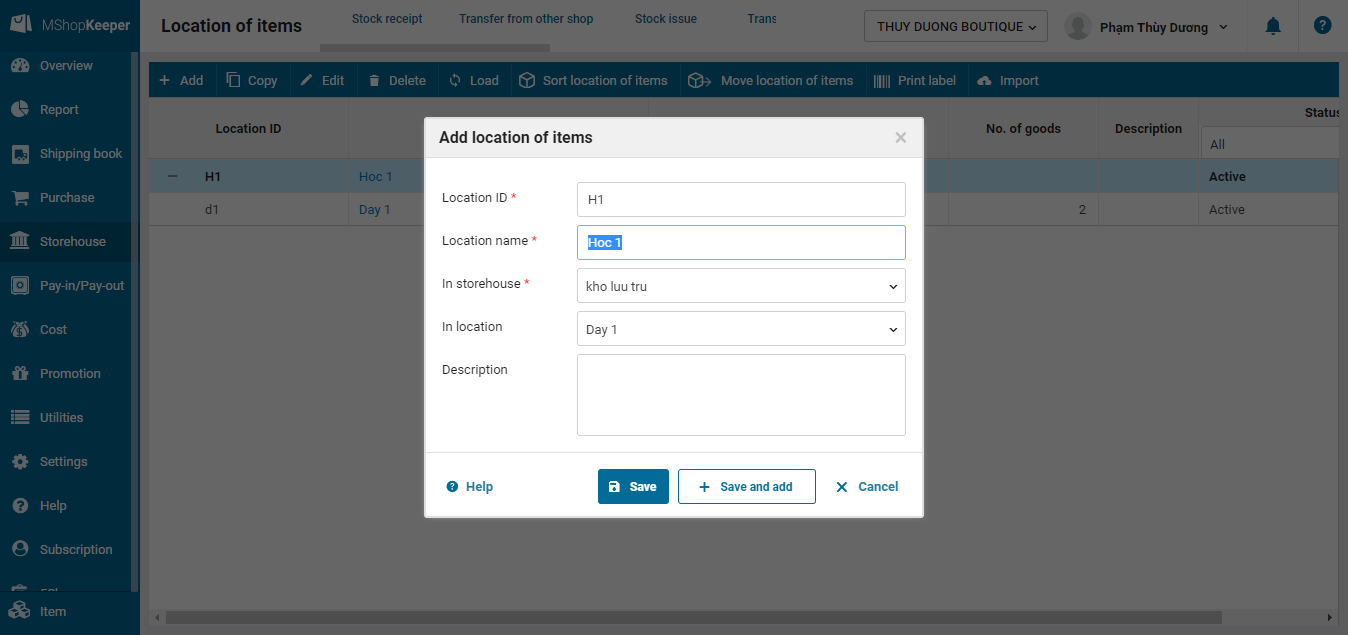
Step 3: Add location and then click Save
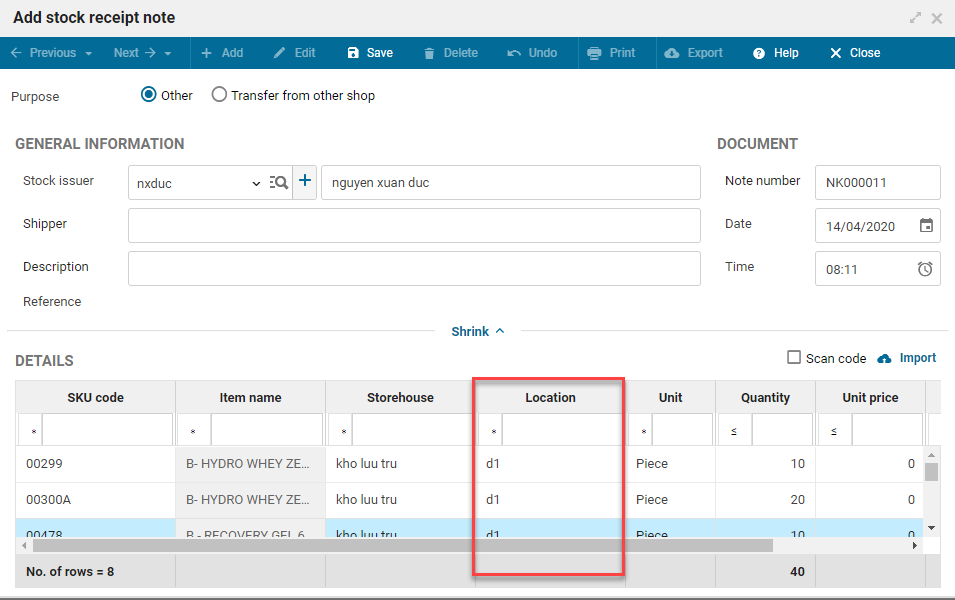
Step 4: Assign location to the items or add stock receipt/issue notes in/out the location
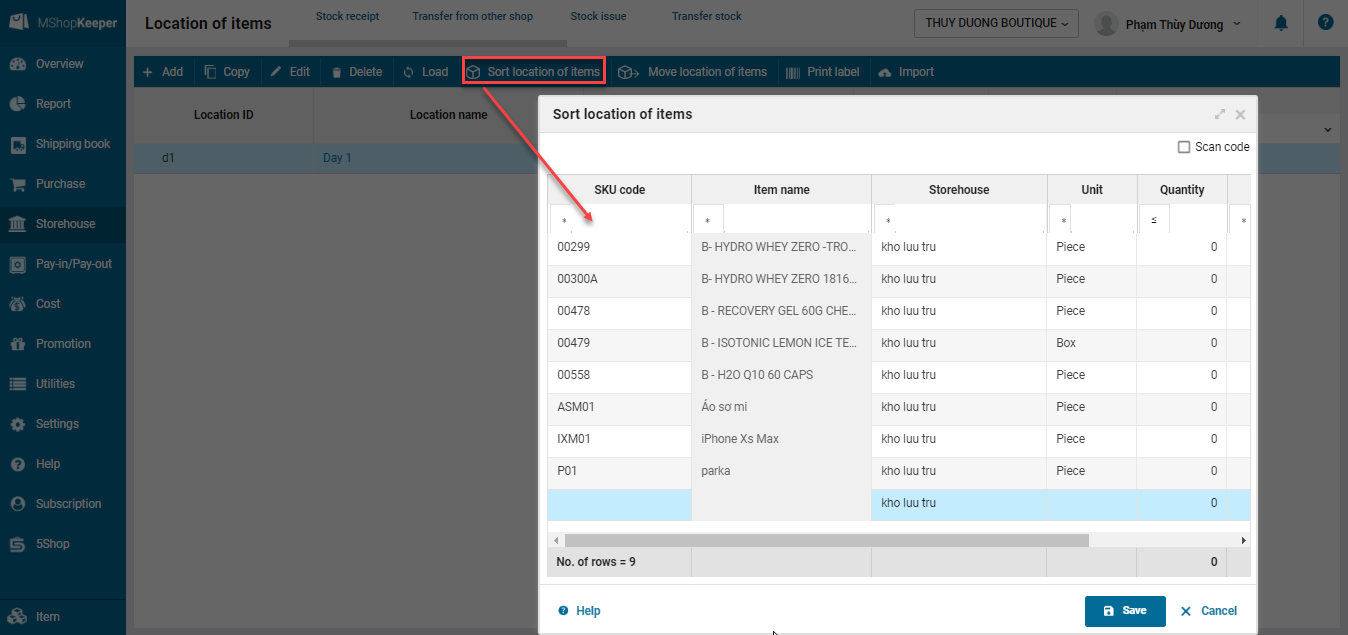
– Assign location: Click Assign location, select items to be assigned and then click Save.
– Add stock receipt/issue notes in/out the location
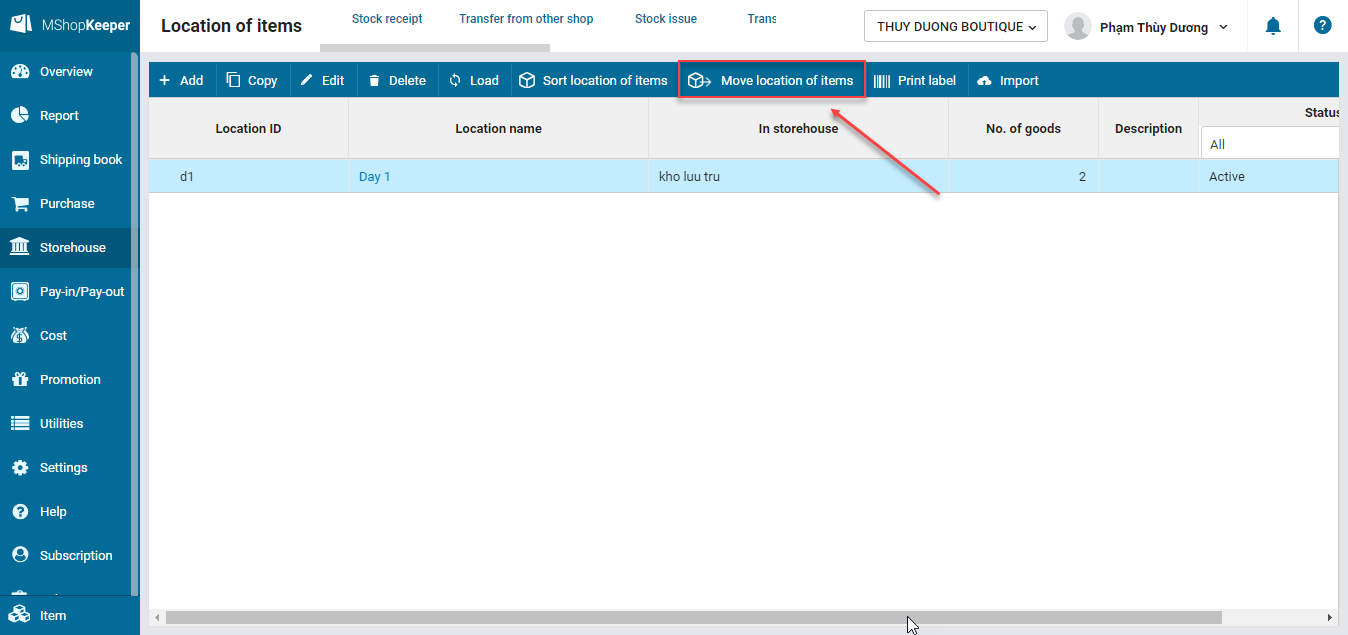
– Move location of items: To move items from location to location
Step 1: Go to Item location and click Move location of items
Step 2: Add items to move to the list
- Alternative 1: To move items individually
Step 1: Select item or scan bar code to add items to the list
Step 2: Select storehouse, current location, destination location, quantity
Step 3: Click Save
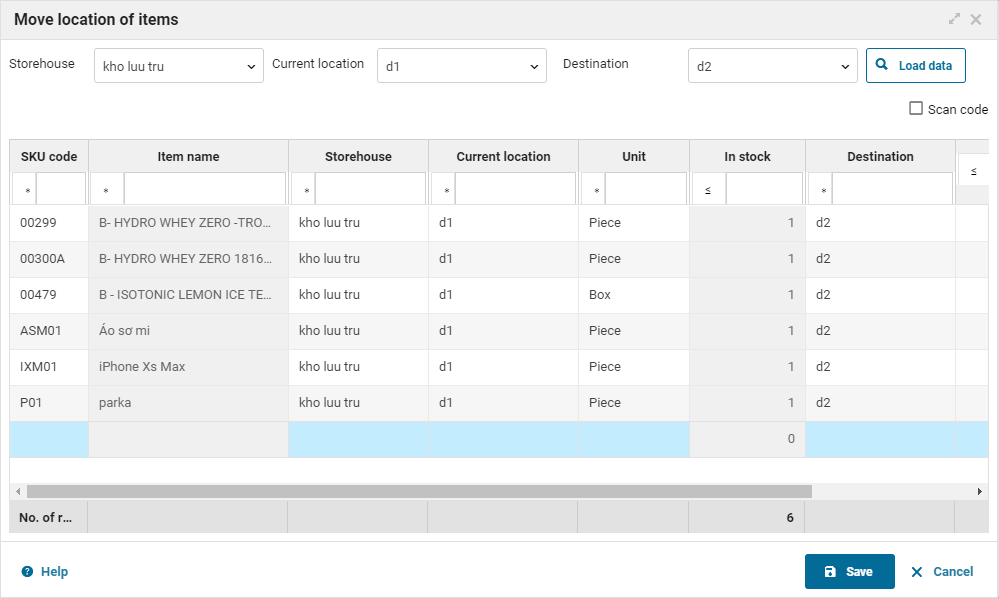
- Alternative 2: To move all items in 1 location to the other location.
Step 1: Select storehouse

Step 2: Select current location to move all items
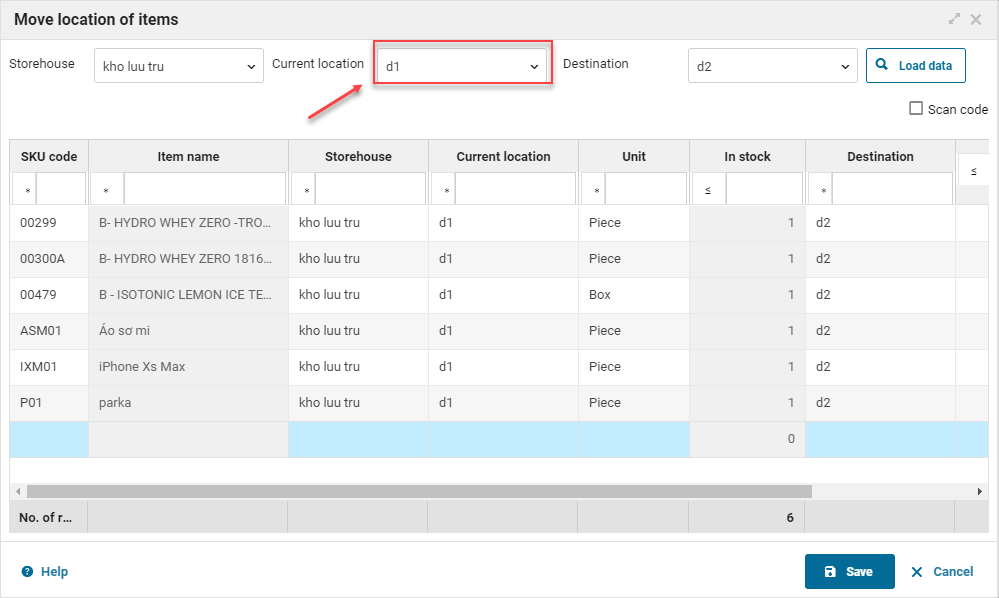
Step 3:
– Move items to different locations: Click Load data, then select location for each item.
– Move all items to 1 location: Select the destination and click Load data
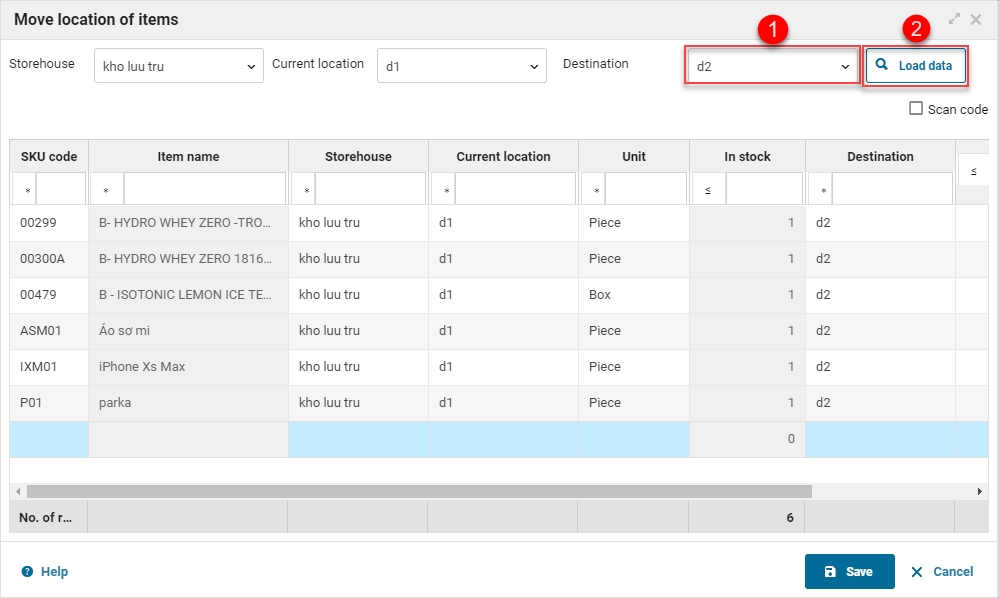
Step 4: Enter quantity to move and click Save
*** Note:
– After saving Assign location list, the program does not allow to edit quantity => The manager should enter quantity exactly in order to ensure that the inventory on the program is correct.
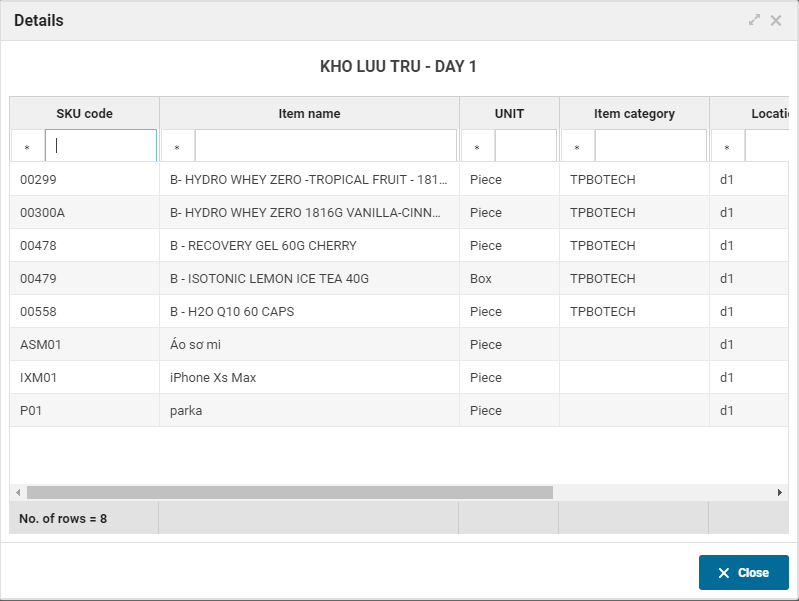
– Check items in a location: click on the location name on list of locations
– Checking stock: On items which select lot and location to check, the program will load inventory by location NOT by lot.
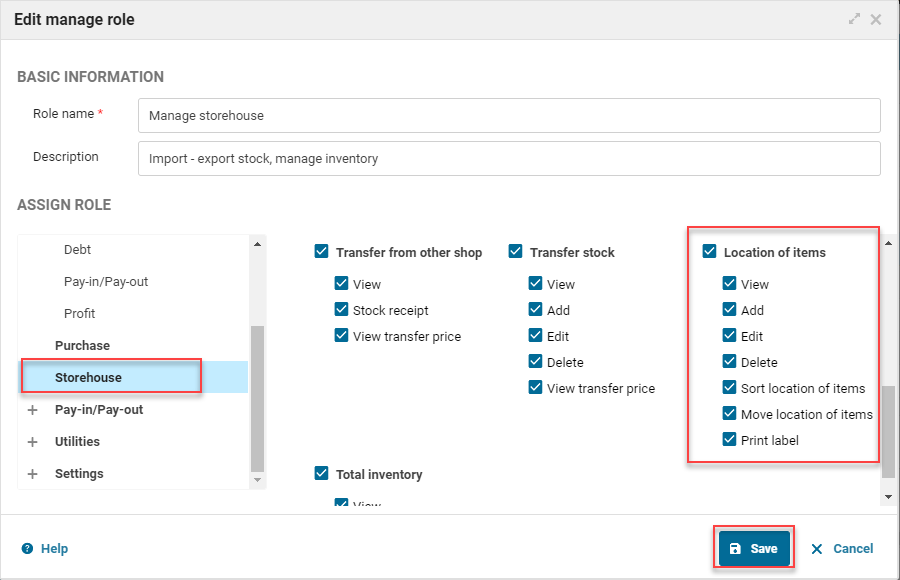
– To assign roles in Item location the administrator goes to Settings/Role management, selects Storehouse and checks the roles to be assigned. Then click Save.
- On PC Sale
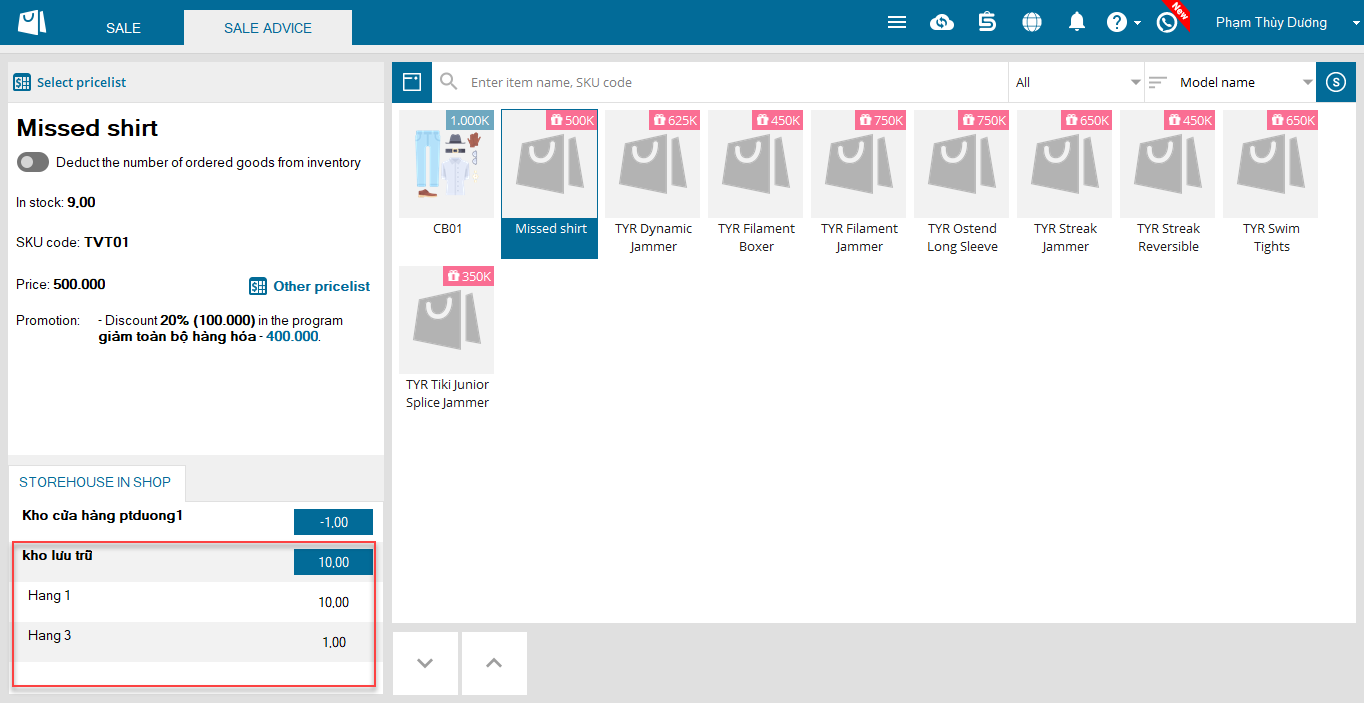
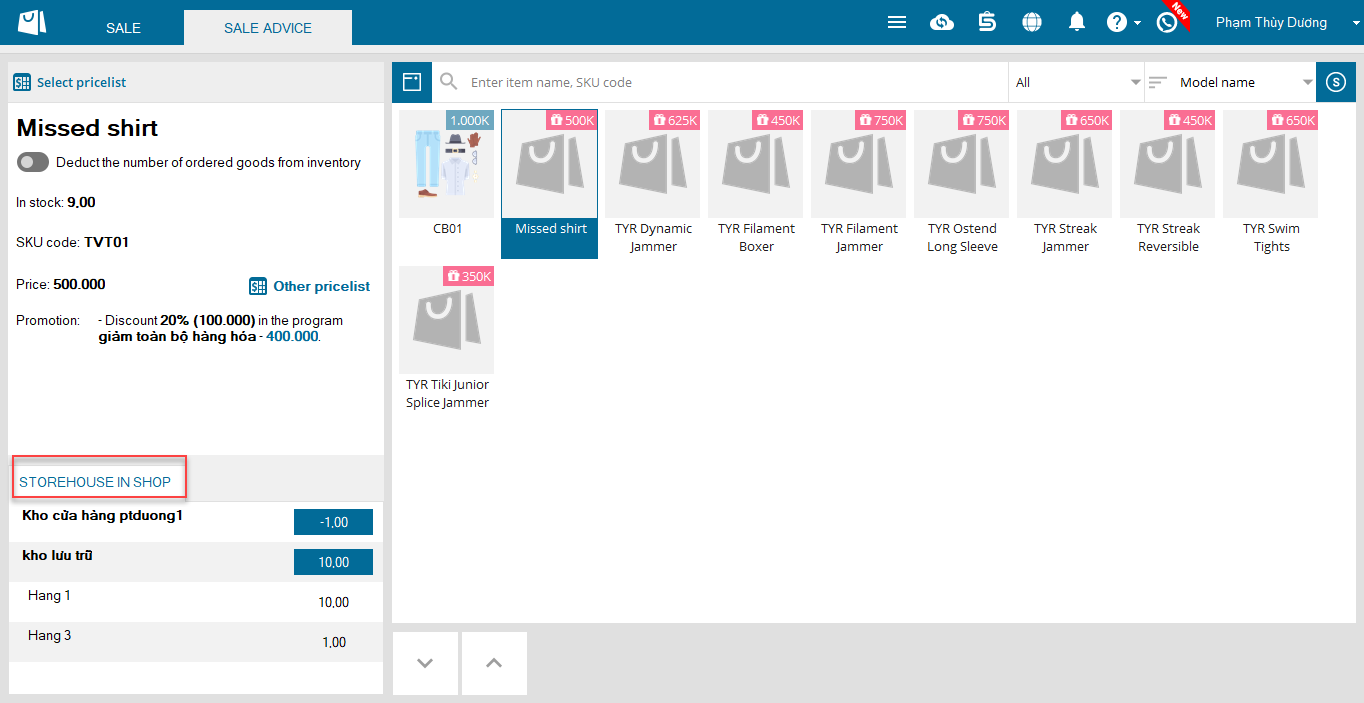
– Check inventory of items by location
Step 1: Go to Sale advice
Step 2: Select items to check inventory by location
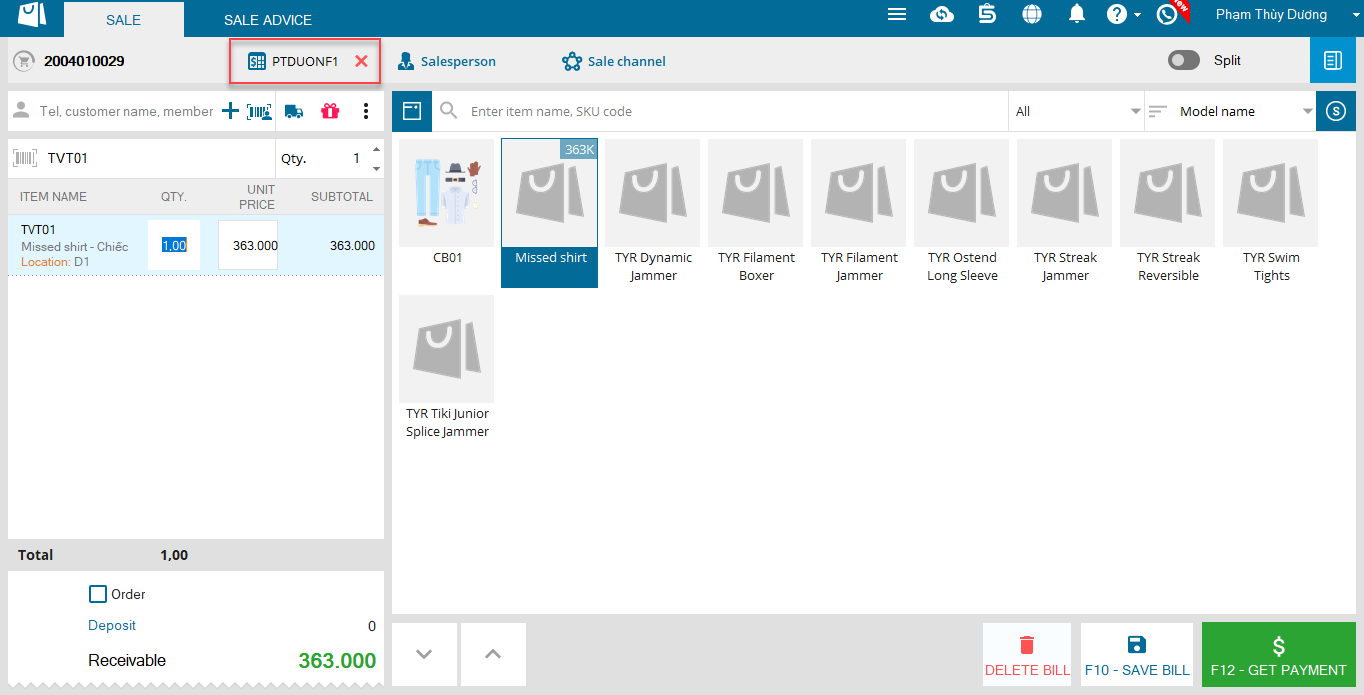
– Select location upon sale
Step 1: Add item including location to the bill. The program defaults any location for the item.
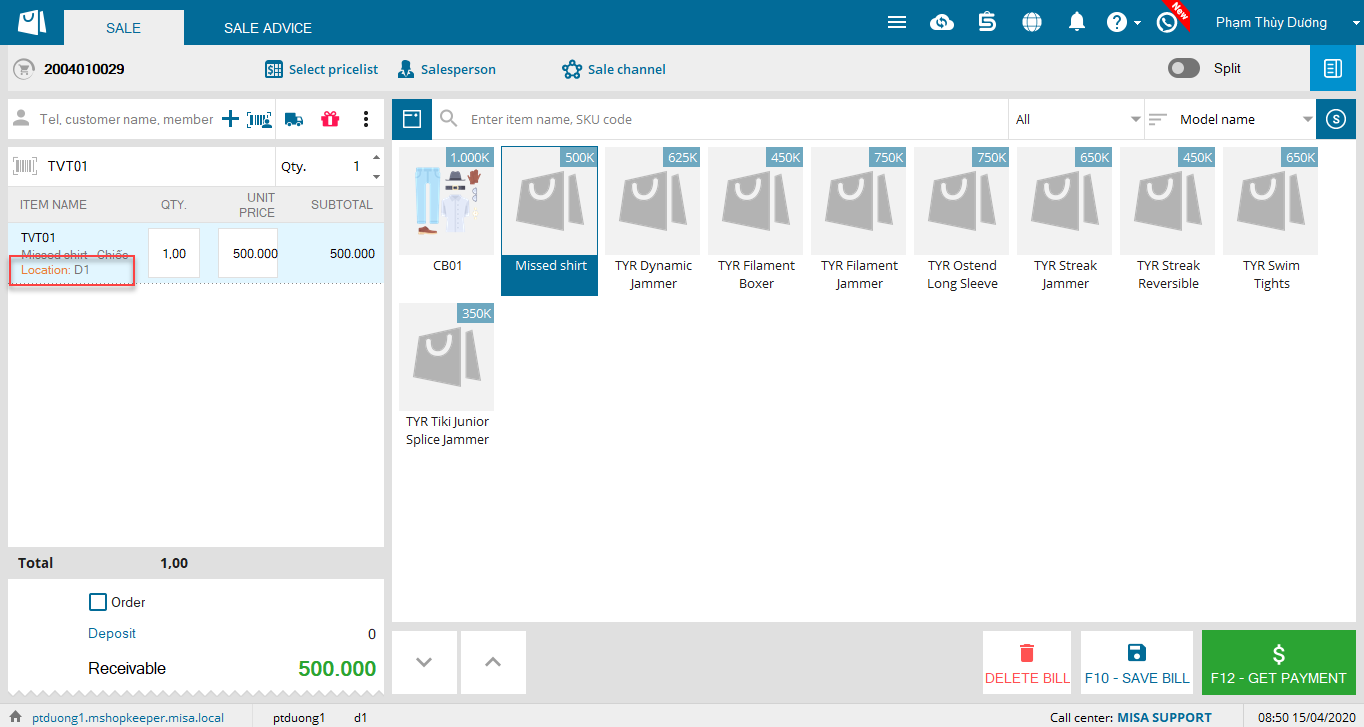
Step 2: Right click on the item to select location again (if you want)
***Note:
– The Sale advice screen only shows Storehouse tab when the shop has 2 storehouses or more
2. The manager can merge multiple checking notes into one to handle.
Details of change: The manager assigns many staff to handle checking stock. These staff use different devices. After checking, the manager wants to merge all notes into 1 and handle difference (if any). Therefore, as of R31 the program allows to merge multiple checking notes into one.
Instruction steps:
Step 1: Go to Storehouse/Stock checking, the program adds Merge notes button and merge status.
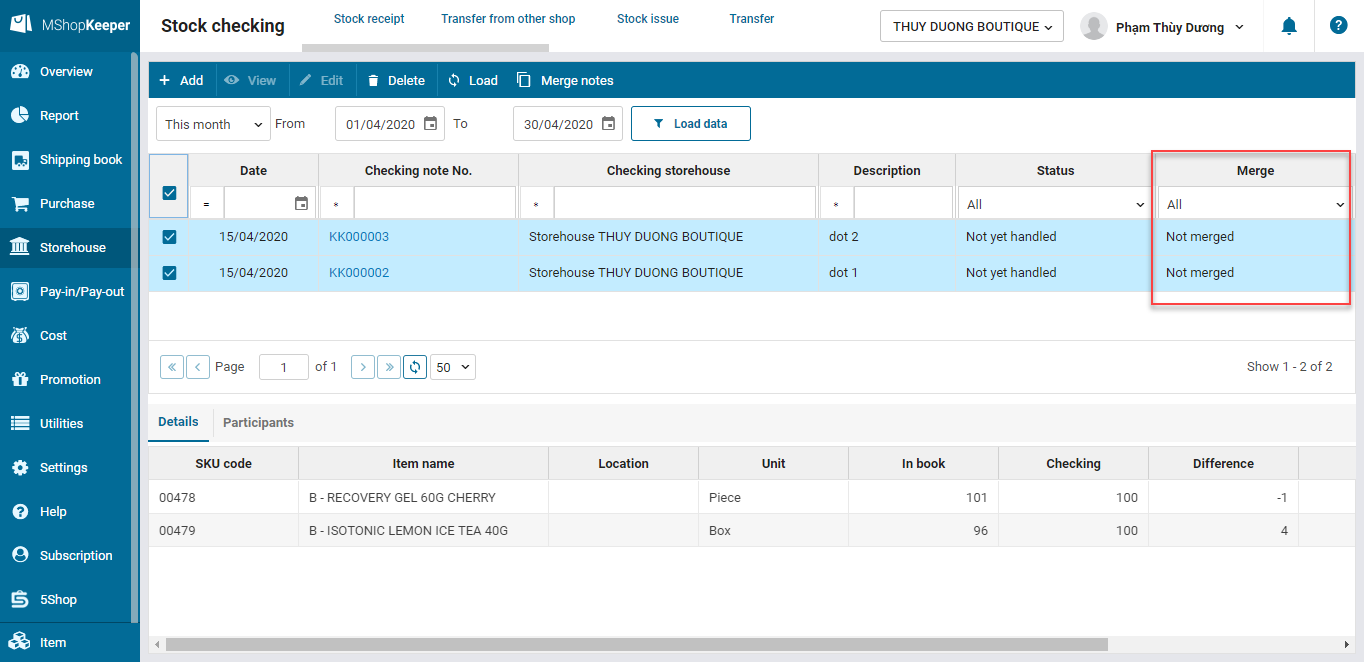
Step 2: Check the notes to be merged. Then click Merge notes
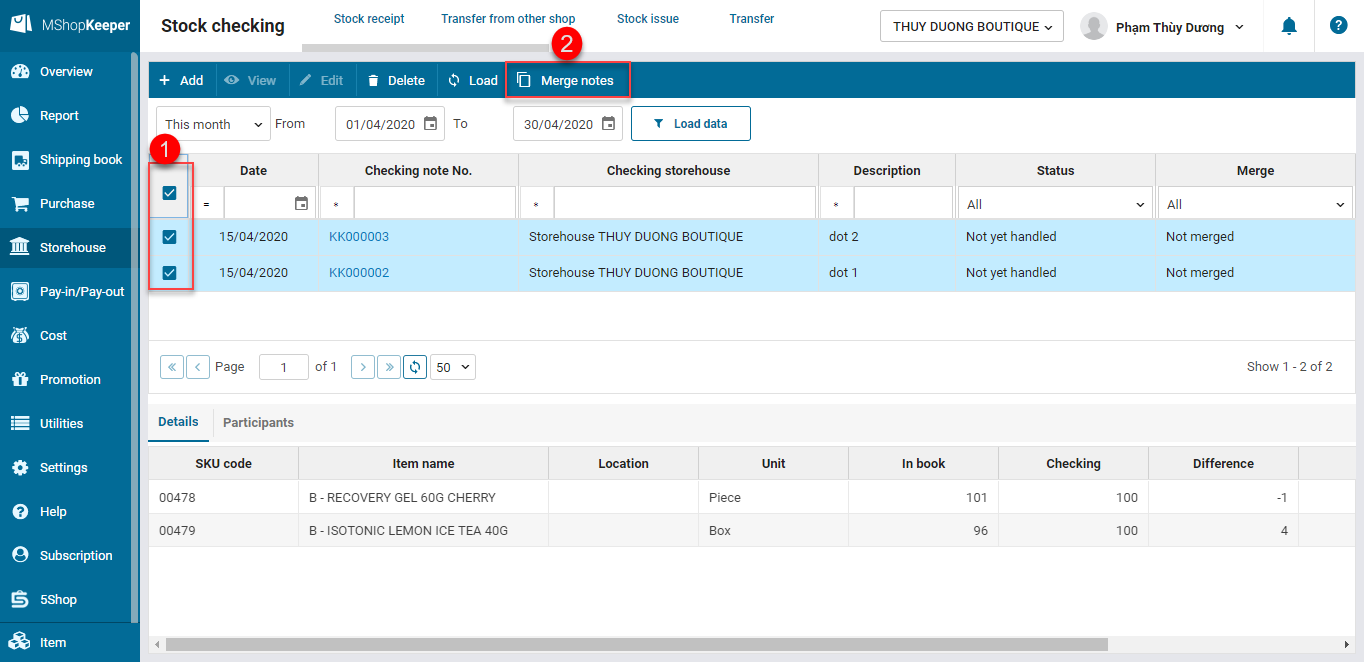
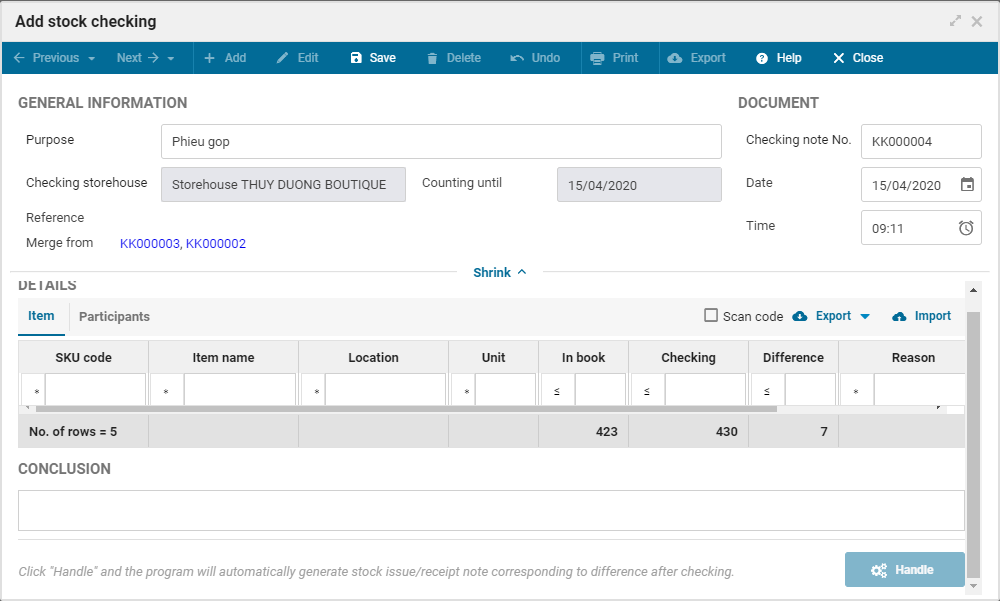
=> The program merges notes into 1 note to summarize. In which:
– Column In book loads inventory at the time of merging
– Column Checking loads total quantity after merging the rows with the same items
– Conclusion loads conclusions from all notes
– Participlants loads all participants in the notes
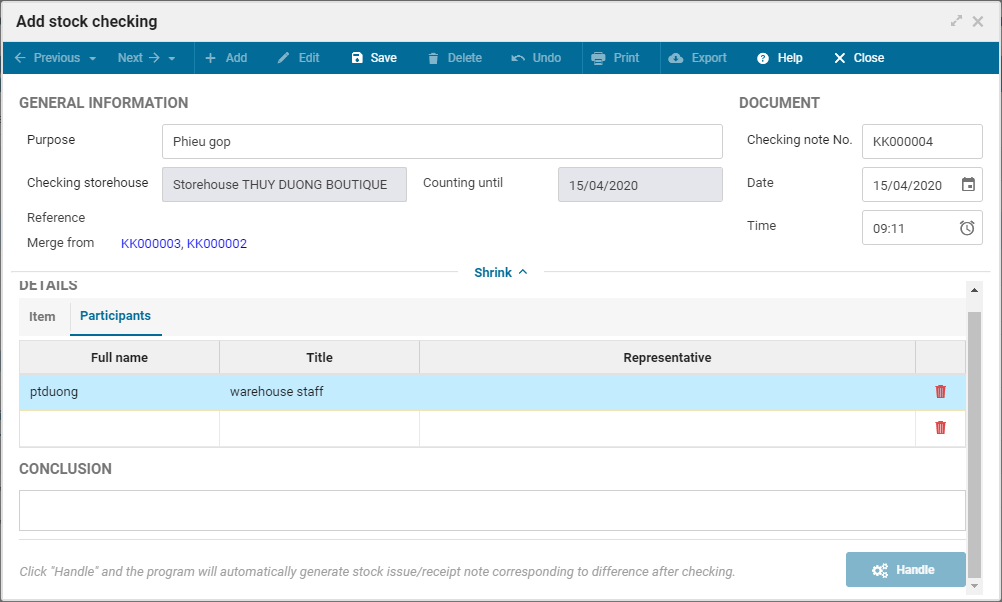
Step 3: Click Save. Then handle if there is any difference. After saving the merged note, the checking notes will change the status to Merged
***Note:
- Merge notes button only works when 2 checking notes are checked, in Not yet handled and Not yet merged status.
- Cannot merge notes in Handled or Merged status.
- Cannot handle or edit/delete checking notes in Merged status.
- Cannot merge checking notes by lot.
- One item with different lots or locations will be shown in different rows.
3. The program allows to select to apply pricelist to all items or by item category
Details of change: Previously, to add pricelist for all items by item category it takes the user a lot of time to select items or enters import file. As of R31, the program allows to select to add pricelist to all items or by item category. This saves the user a lot of time from creating a pricelist.
Instruction steps:
1. Add pricelist
- Select to apply to all items
Step 1: The program defaults to apply to all items upon adding any pricelist. The user enter formula which will be applied to all active items.
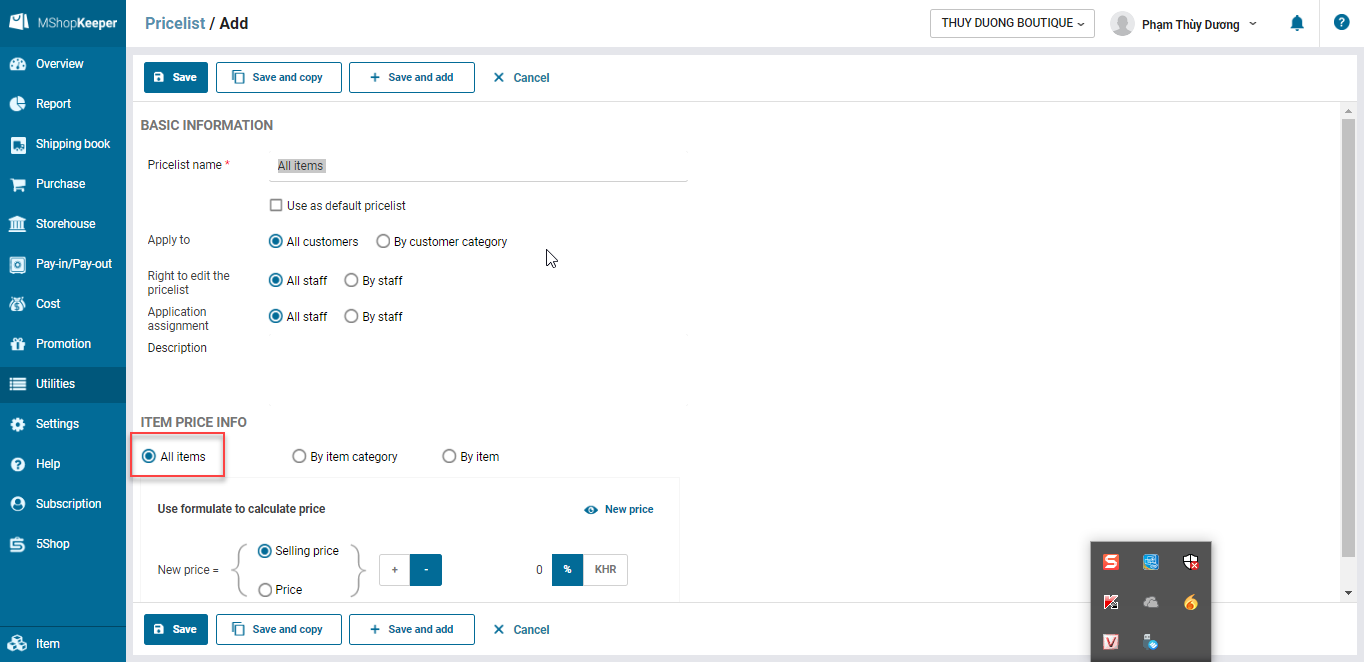
Step 2: Click the buttonto view price of the item after applying the formula
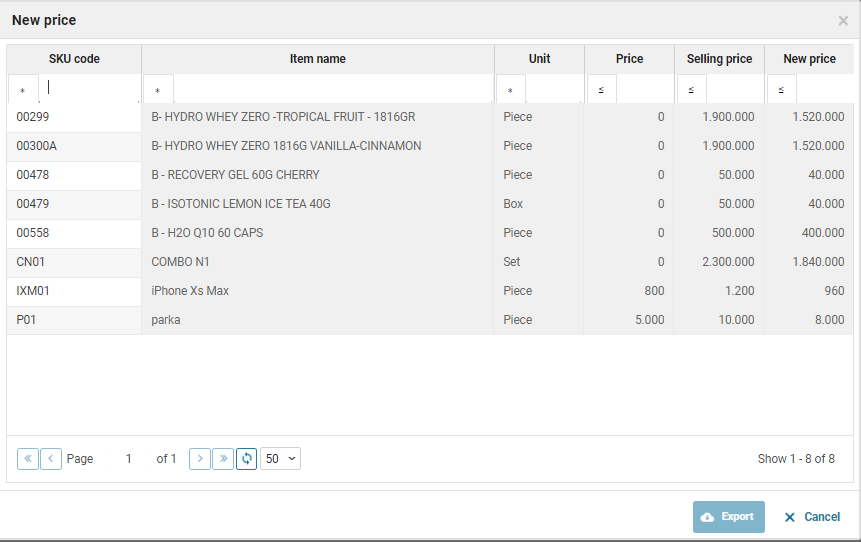
Step 3: Save the pricelist
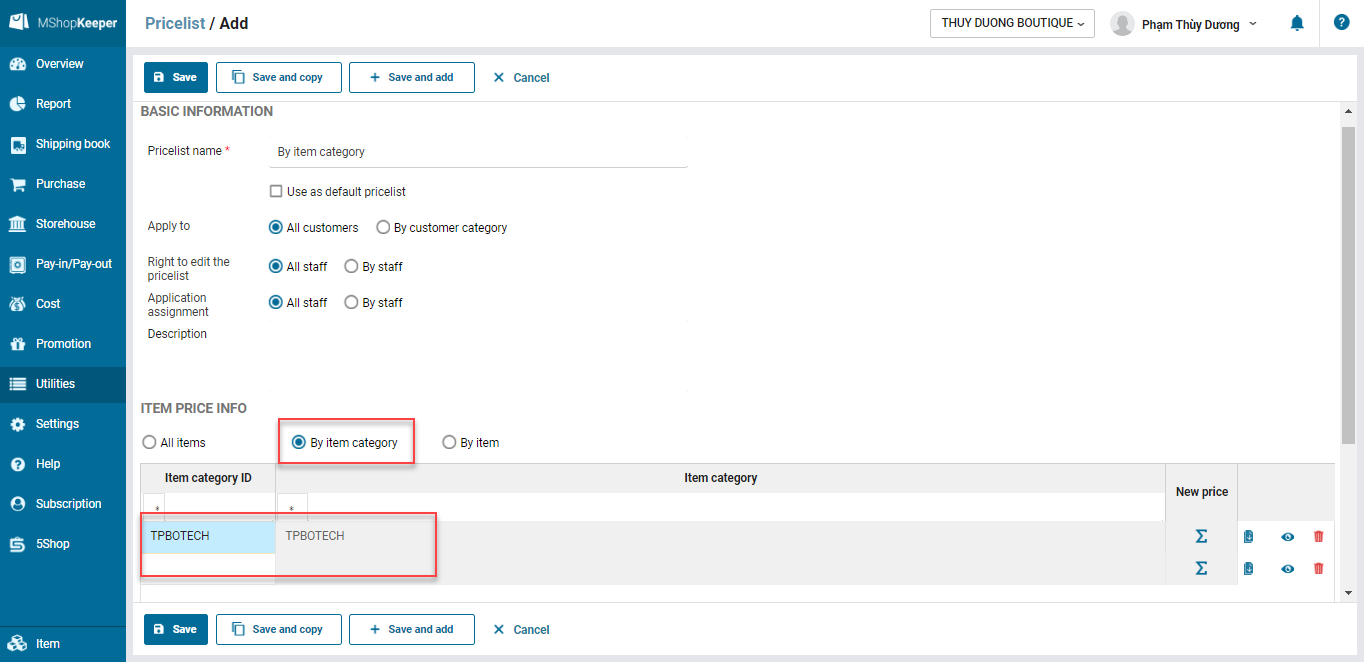
- Select to apply to By item category
Step 1: Select item category to be applied
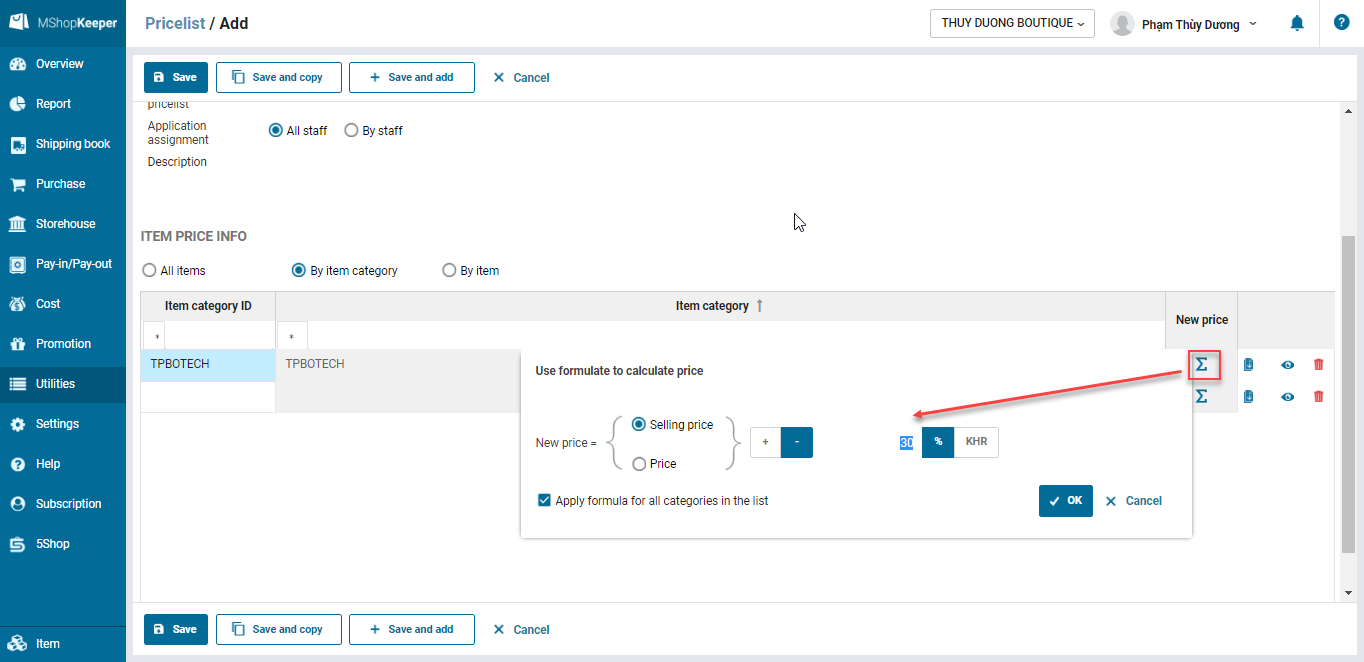
Step 2: Enter formula
Step 3: Check out new price of each item category after applying the formula
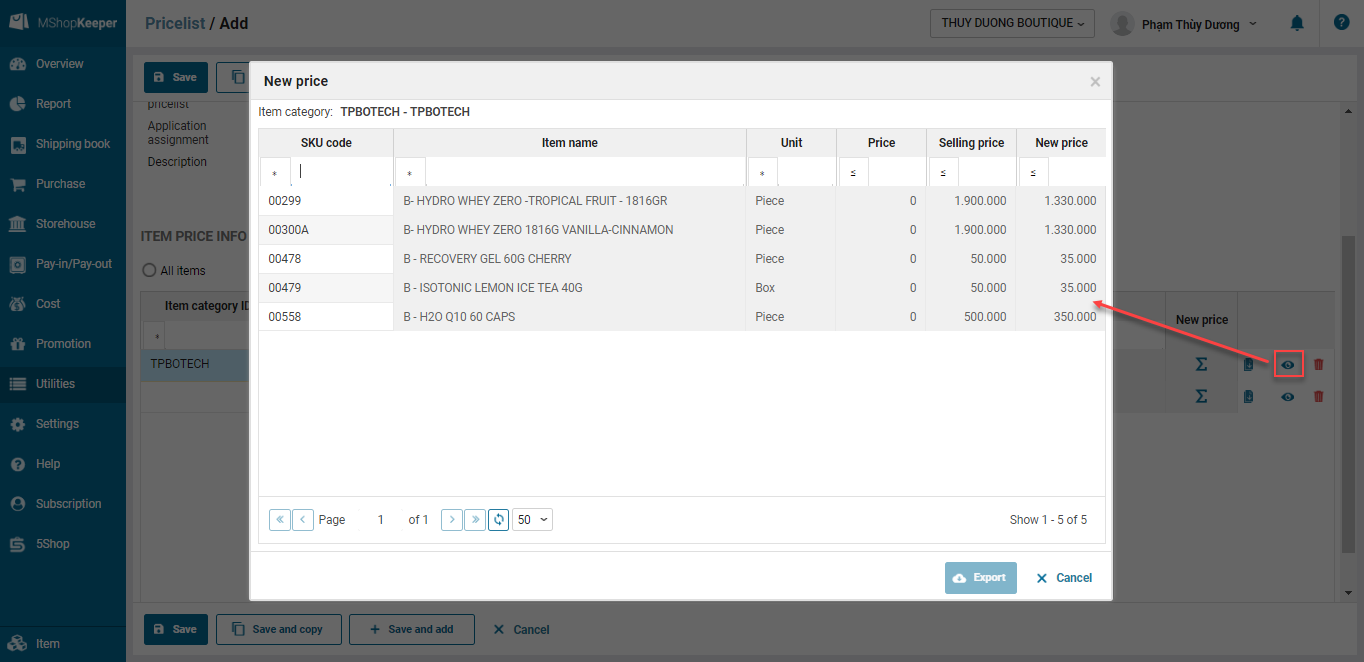
Step 4: Save the pricelist
- Select to apply By item: If you only apply the pricelist to some items, you can select to apply By item and follow the same steps as above.
2. Apply the pricelist just added on PC Sale
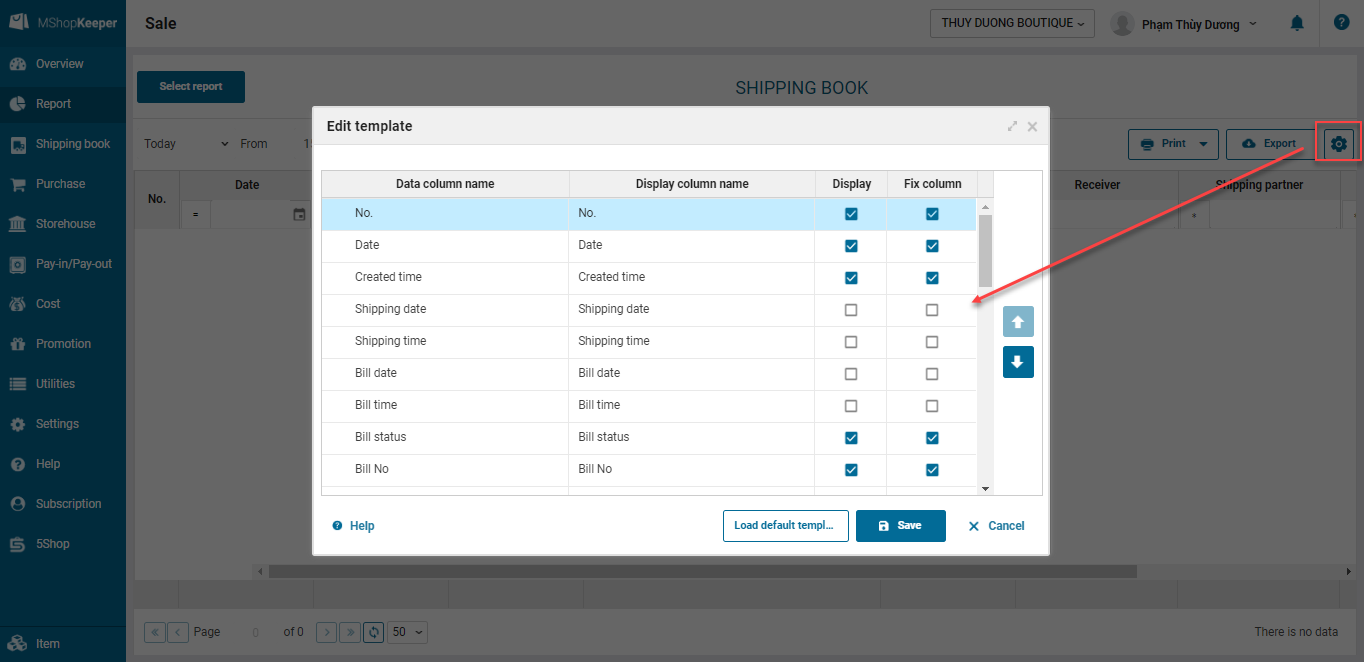
4. On Shipping book, the manager wants to include address, item information to export and send to the shipper
Details of change: The program improves Shipping book which adds item information so that the manager can easily check to export and send to the shipping partners.
Instruction steps:
Step 1: Select to view Shipping book, click the icon 
Step 2: Check information and click Save
The program adds these columns: Order date, Shipping date, Address, District, Commune/Ward, Amount, Promotion, Item information.
Step 3: Check Shipping book report
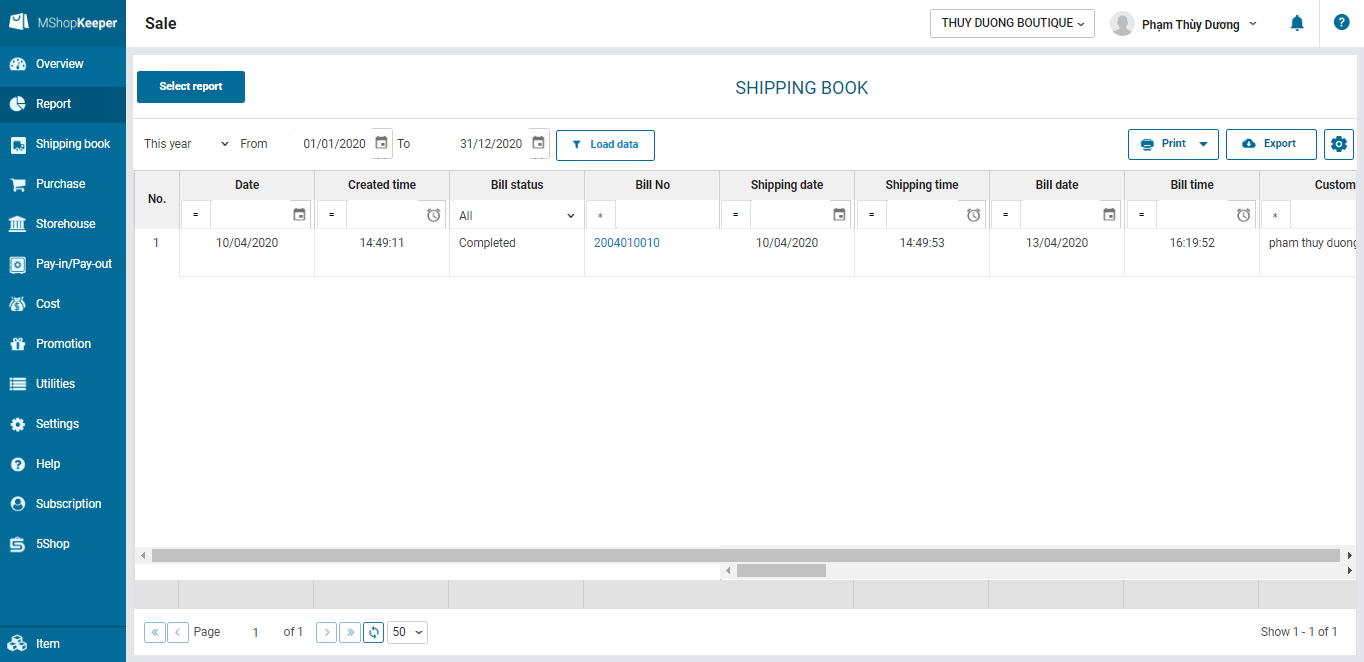
Export the report

II. PC
1. The program adds A6-sized shipping note which shows price before and after promotion.
Details of change: As of R31, the program adds A6-sized shipping note which shows price before and after promotion so that the customer can easily check what they have ordered without asking the shop again.
Instruction steps:
Step 1: Go to Settings/Printer and Template settings, on Printer and Shipping note template settings click Settings
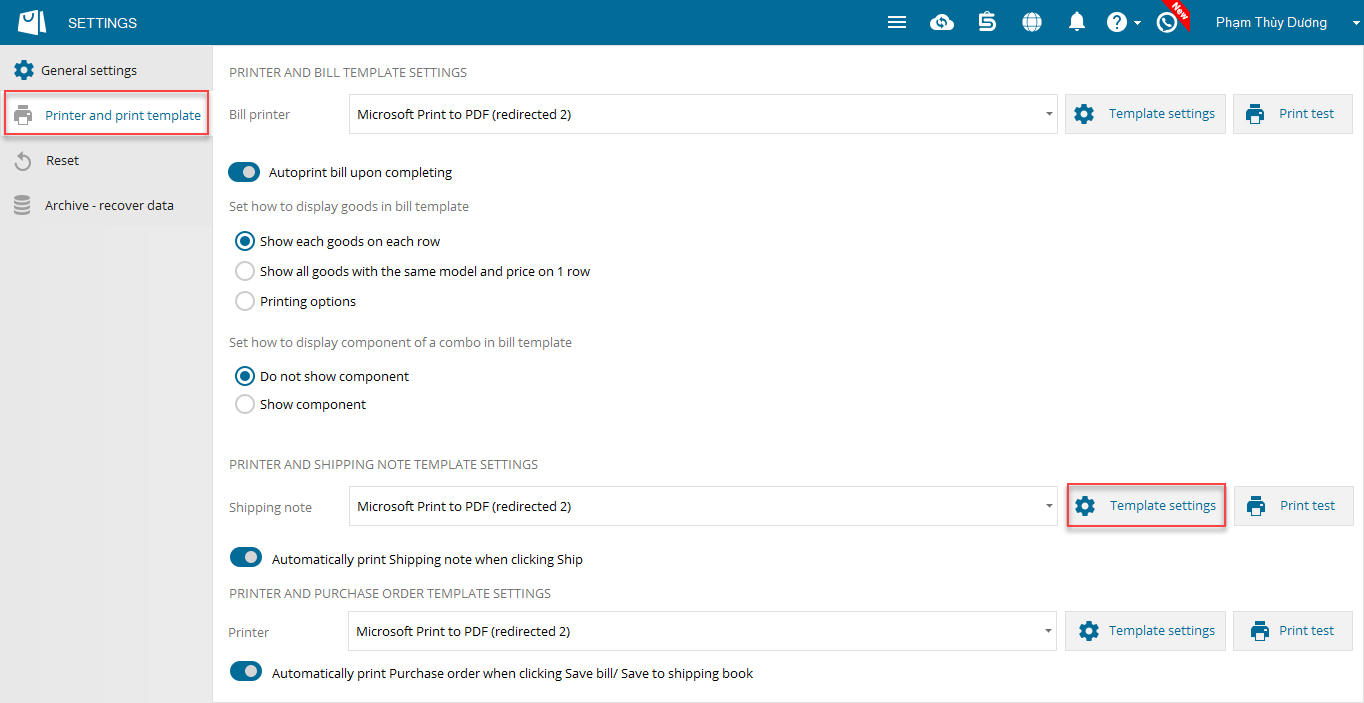
Step 2: Select A6, Template 3
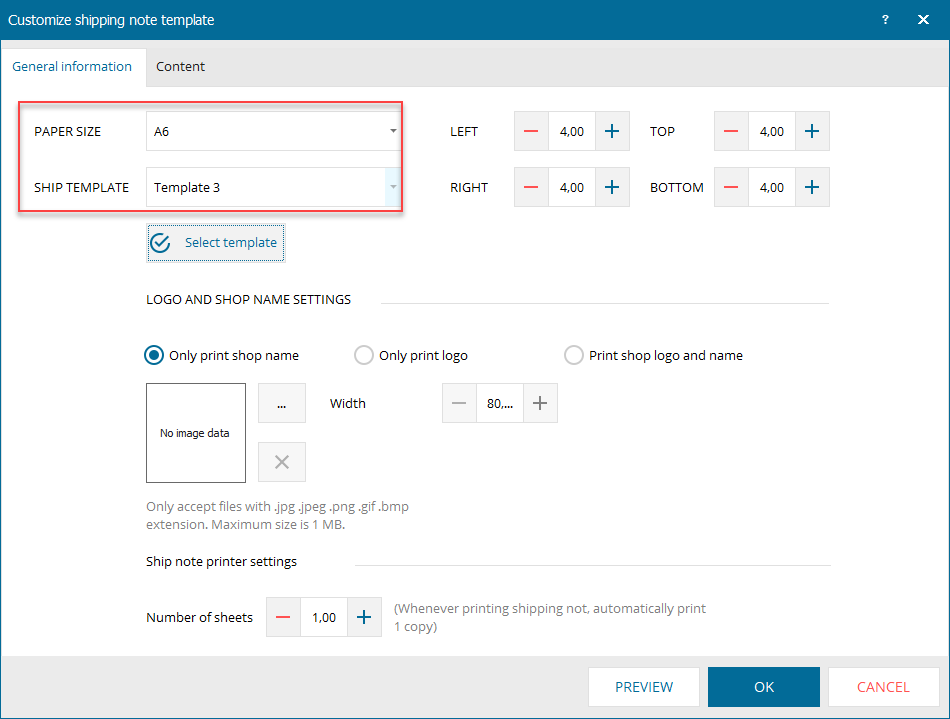
Step 3: Print shipping bill and shipping note

2. When advising the customer, the cashier can know price after promotion
Details of change: Previously, when advising the customers about products the cashier has to caculate price after promotion manually. As of R31, the program adds price after promotion so that the cashier can quickly check and advise the customers.
Instruction steps:
The cashier select Sale advicetab, select item to check price after promotion.

3. The program allows to temporarily transfer items
Details of change: The shop manages multiple storehouses: showcase and sale storehouse, storehouse for storage. When the customer tries on and needs different size/color which is not available on the showcase, the salesperson will take it from the storage storehouse. If the customer does not take it, the staff will return it to the storehouse. All of these actions note time, issuing/receiving staff and status. This takes a lot of time. As of R31, the program allows to temporarily transfer items, which helps the storekeeper transfer stock quickly.
Instruction steps:
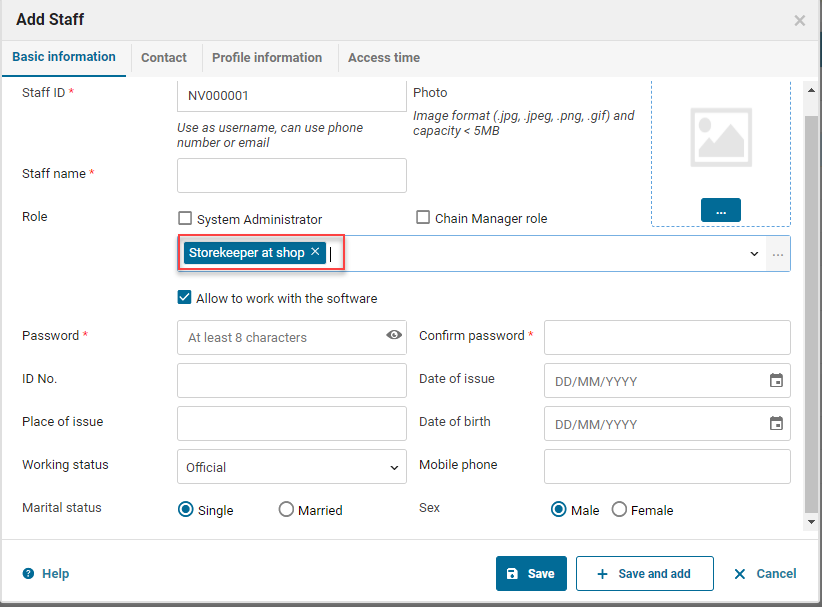
Step 1: On the management page, add staff who can proceed with temporary stock transfer.
Step 2: Log in the program
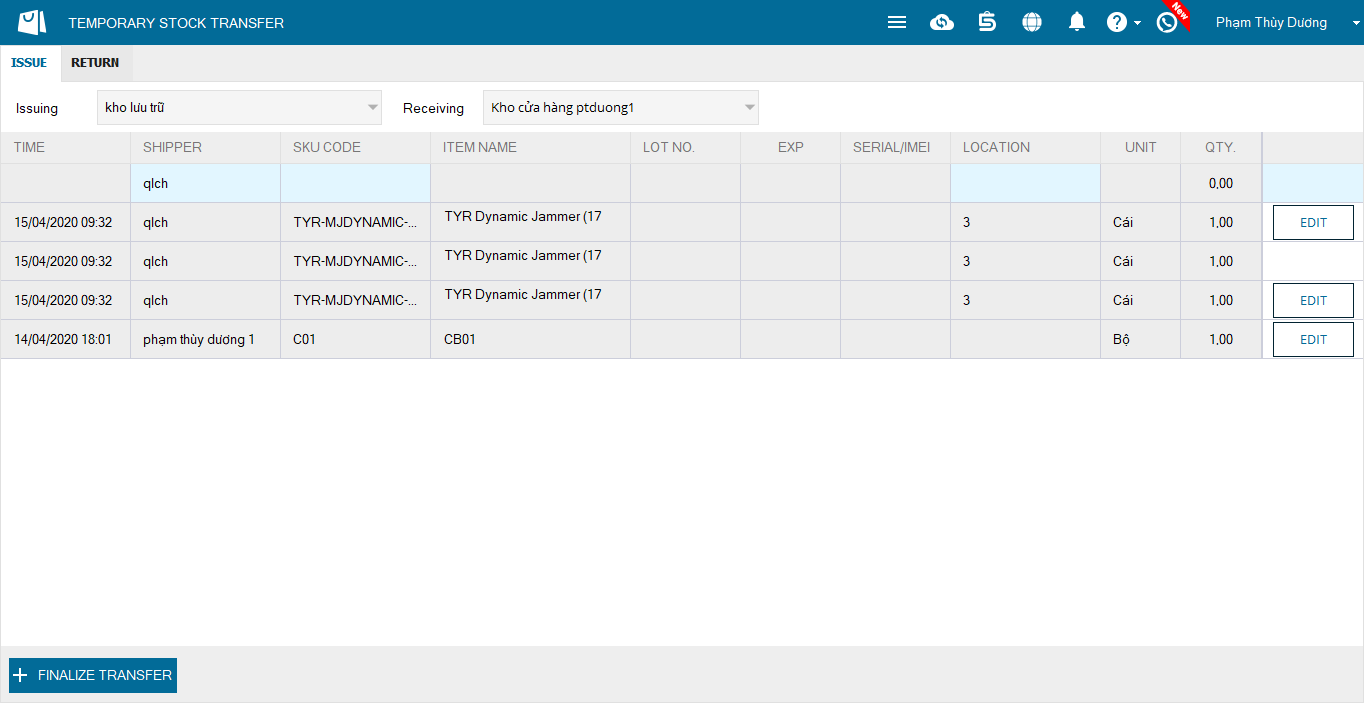
Step 3: Proceed with temporary stock transfer as below
- Issue stock: Select item from the storehouse and issue it for the cashier to sell
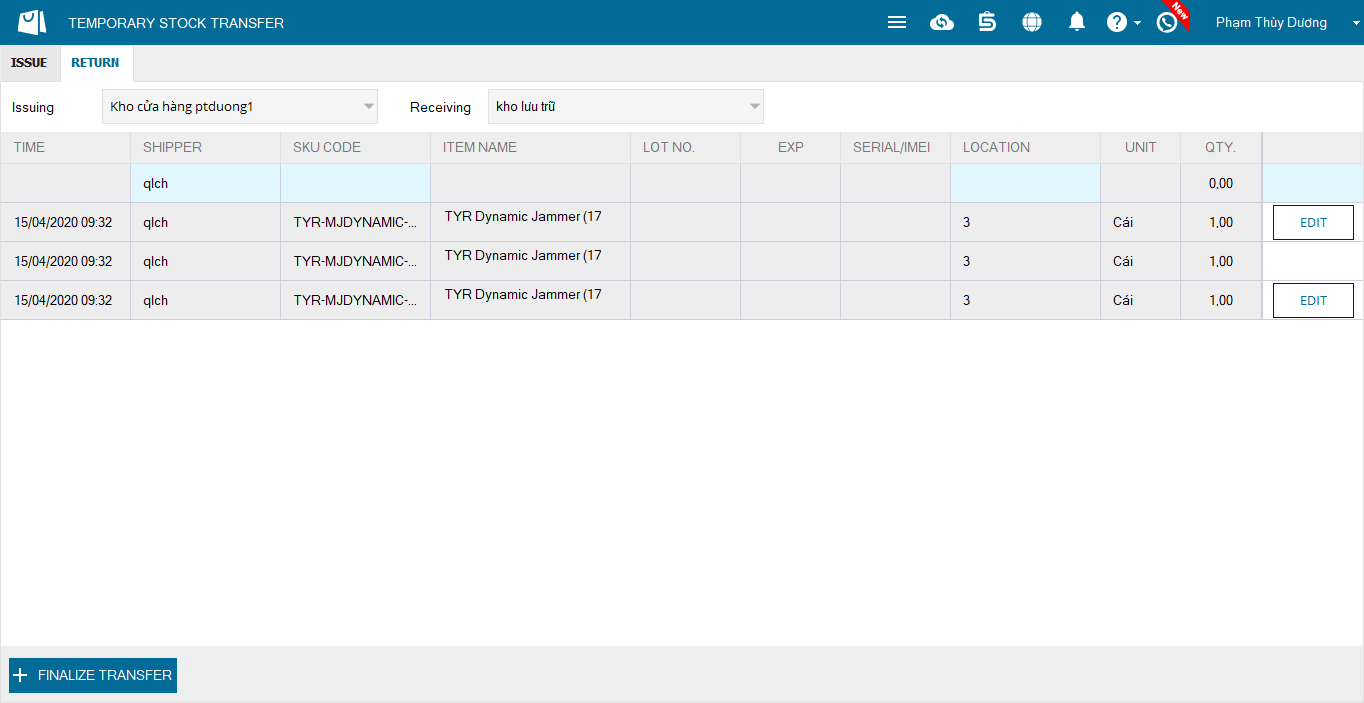
- Return stock: Select item to return from sale storehouse to the storage storehouse
- If the shop has 1 storage storehouse, the program will automatically load issue/return storehouse. If there are 2 storage storehouse or more, the staff select a storehouse to issue or return stock before scanning the item.
- When the staff selects item to issue or return, after 5 seconds the program will automatically save item information.
- The staff selects Edit button on item information to edit it.
- The issued item which is then sold, the program automatically hides Edit button on that item row.
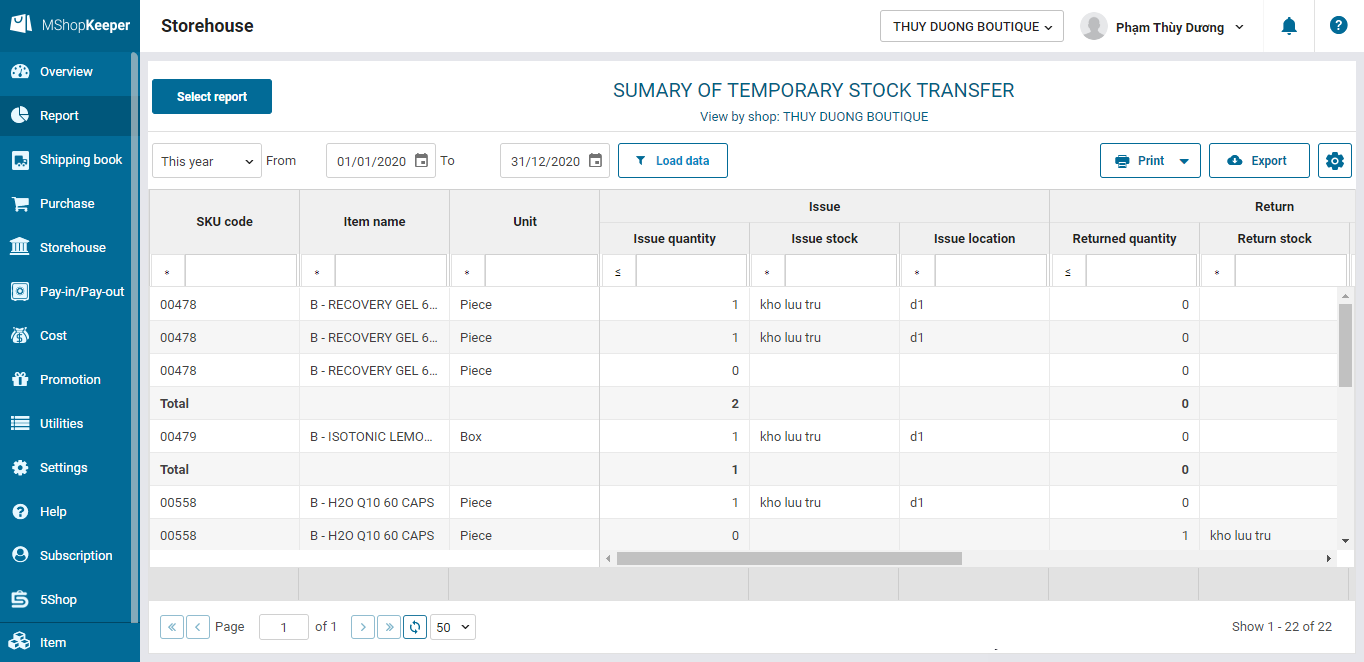
- If there is any stock issue or return, the program will recognize it in General report on temporary stock transfer.
Step 4: Finalize transfer
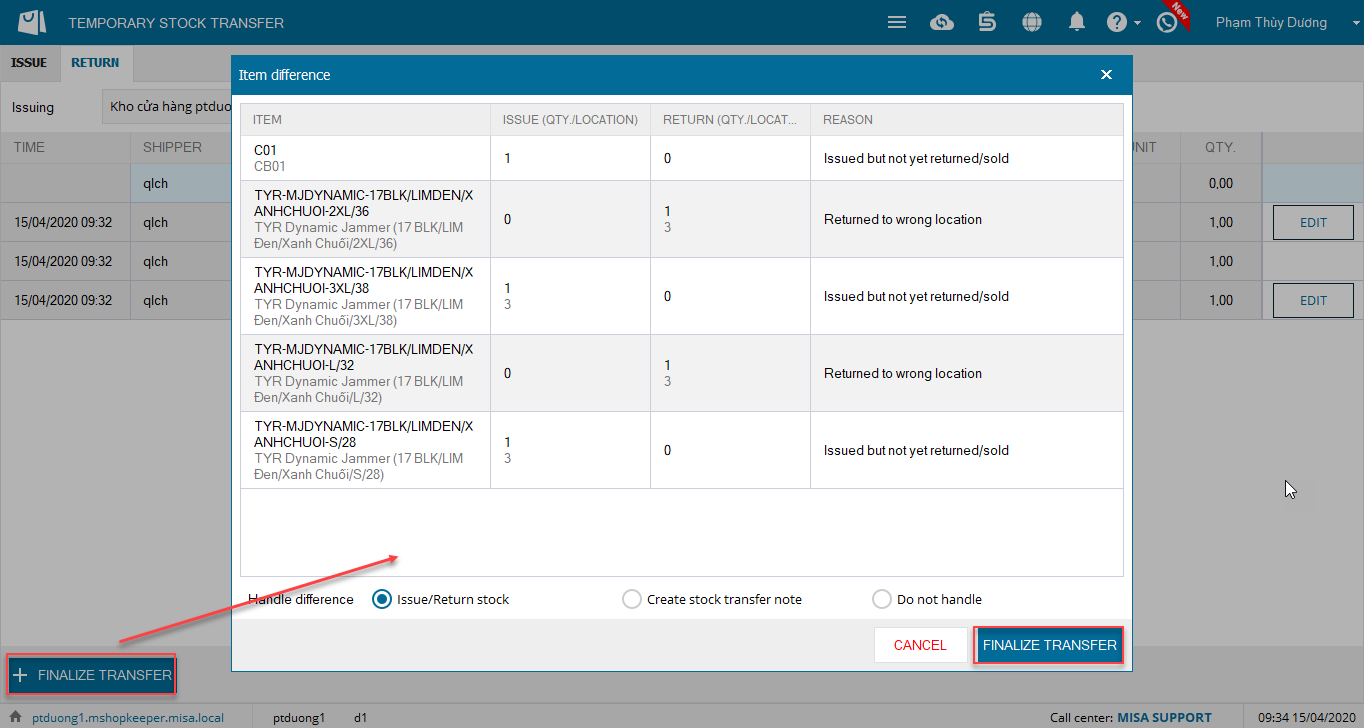 Chọn xử lý chênh lệch
- Issue or return to the temporary storehouse: The program will generate a stock issue or return note for the item involving diffence, recognize it in General report on temporary stock transfer
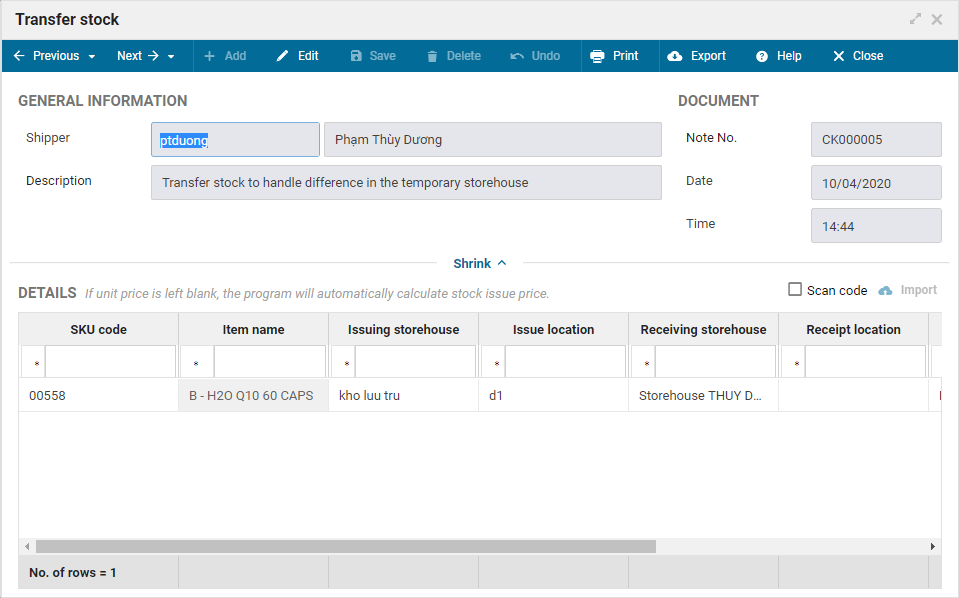
- Create stock transfer note: The program will remain the status of item involving difference and at the same time generate a stock issue note to handle it on the management page.
- Do not handle: The program remains status of the item involving difference and does not handle it
Step 5: View General report on temporary stock transfer
On Storehouse/Report, select General report on temporary stock transfer